 knowledge kit19
Design elements settings would enable to customize the design elements as per your requirement
Header Settings:

- Click the header setting icon
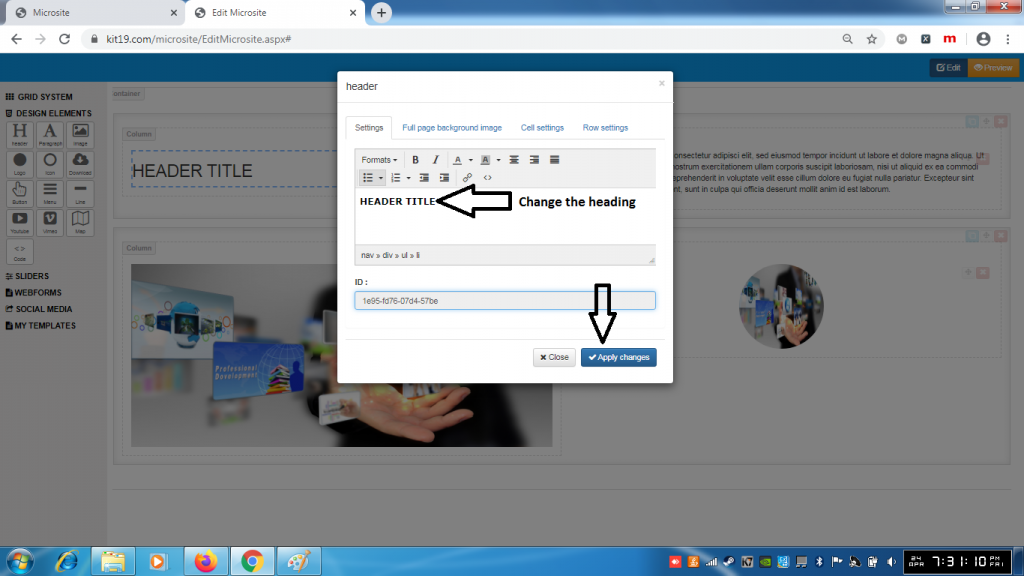
- Change the text of the heading
- Click Apply changes
- The heading would be changed
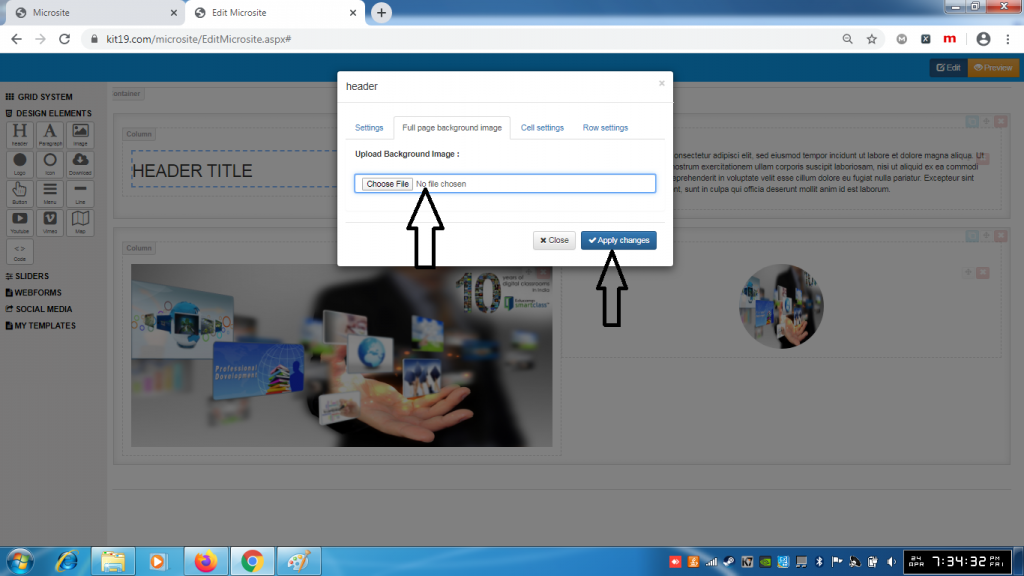
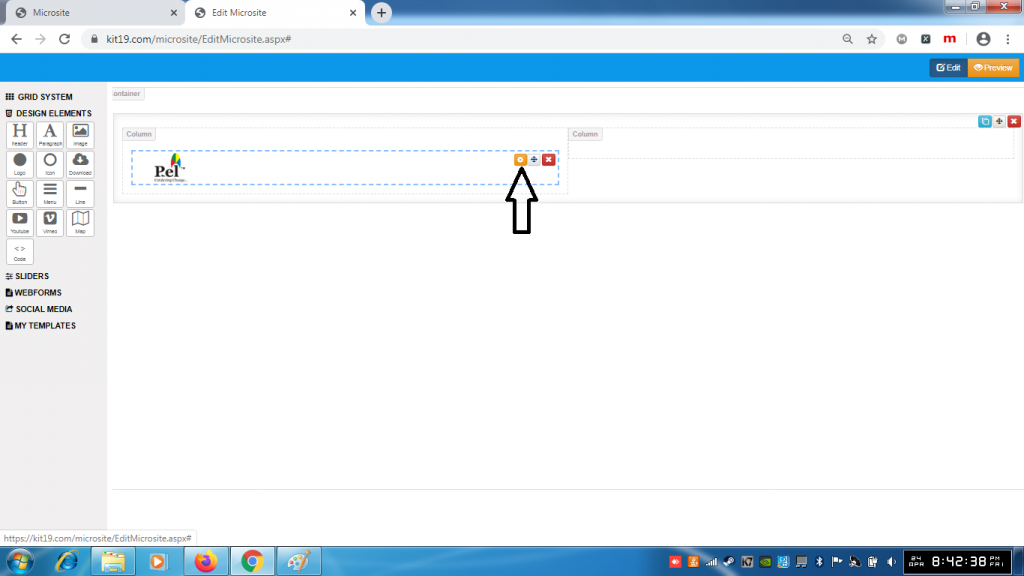
- Choose an image file
- Click Apply changes
- A background image would be added to the header
Note: Once a background image is added it cannot be removed. You can change the background image as many times as you want. To remove the back around image, just delete the header element and add a new one.
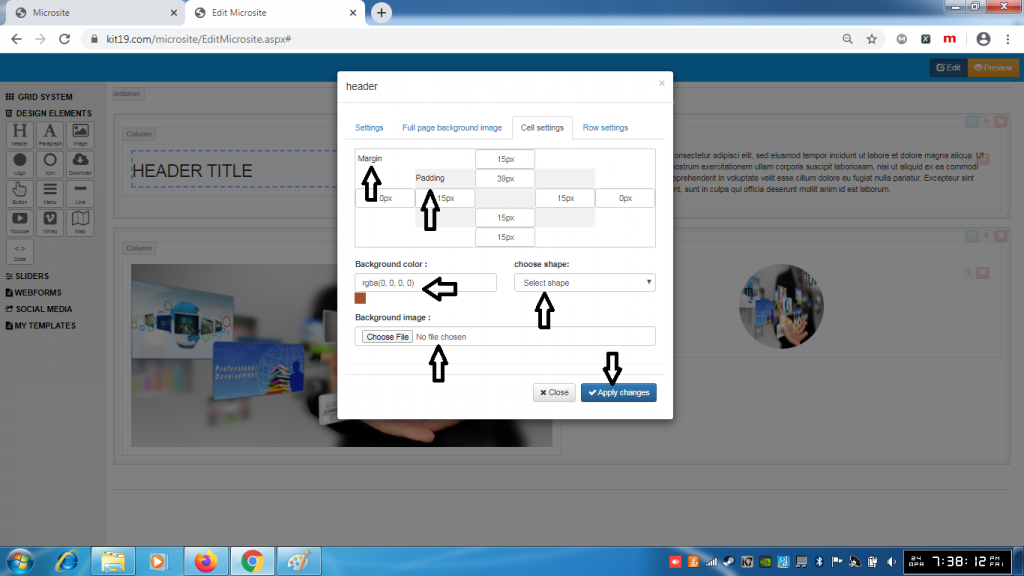
- Change the margin of the header cell
- Change the padding of the header cell
- Change the background of the header cell
- Change the shape of the header cell
- Change the background image of the header cell
- Click Apply Changes
Note: You can change all of the settings of the header cell at the same time or you can change the settings that you like.
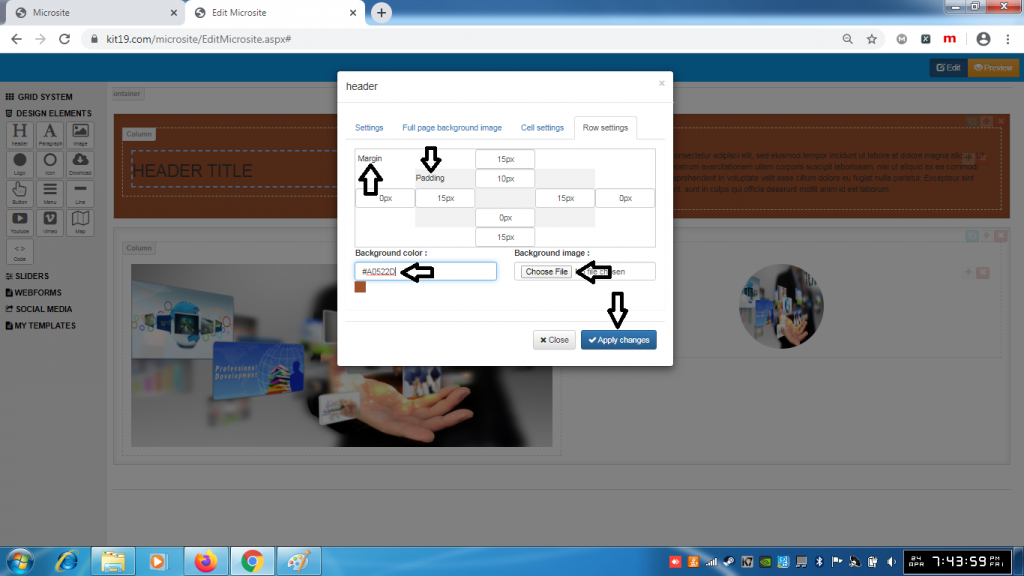
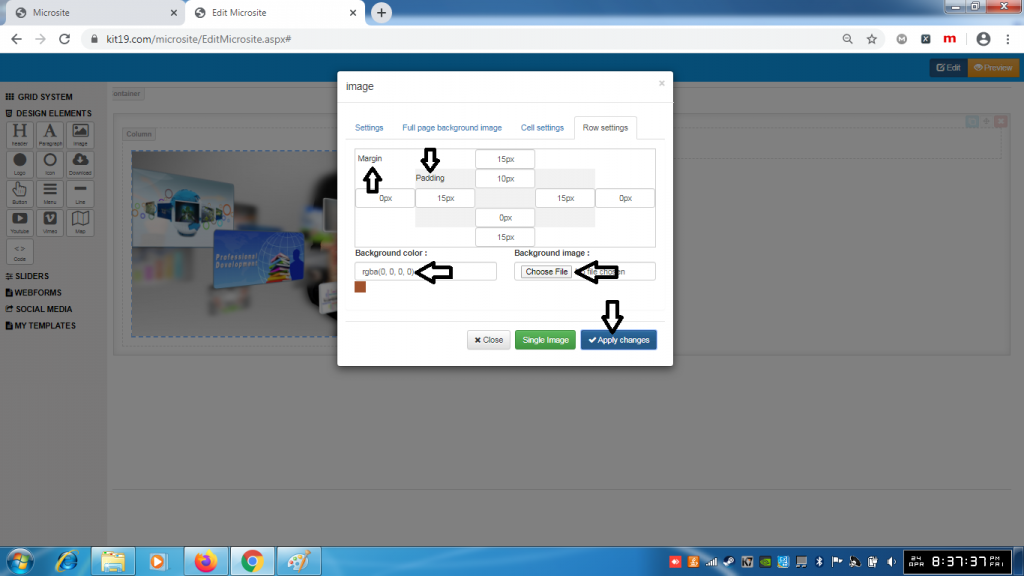
- Change the padding of the header rows
- Change the margin of the header rows
- Change the background color of the header rows
- Change the background image of the header rows
- Click Save Changes
Note: You can change all of the settings of the header row at the same time or you can change the settings that you like.
Paragraph Settings:
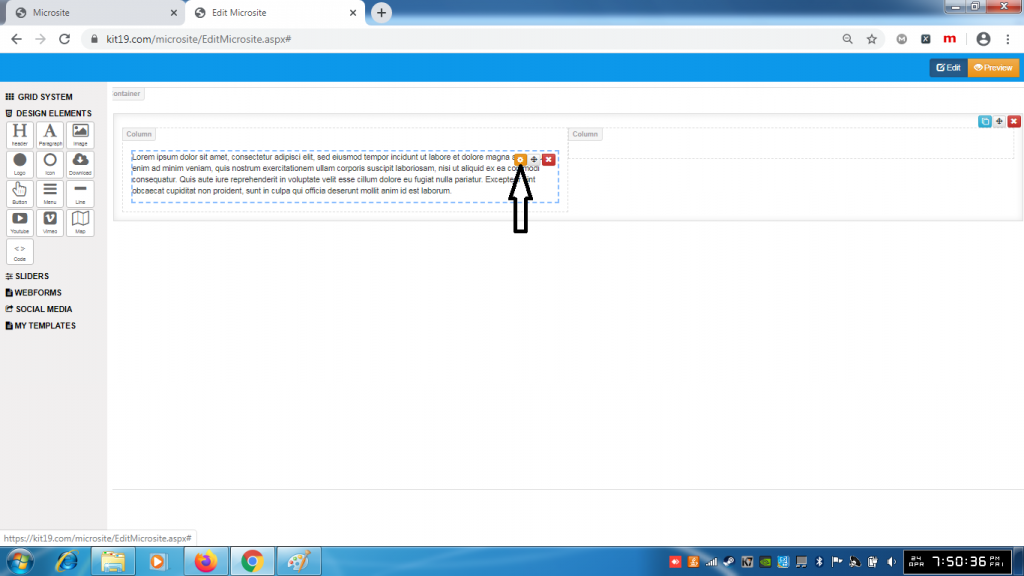
- Click the paragraph settings icon
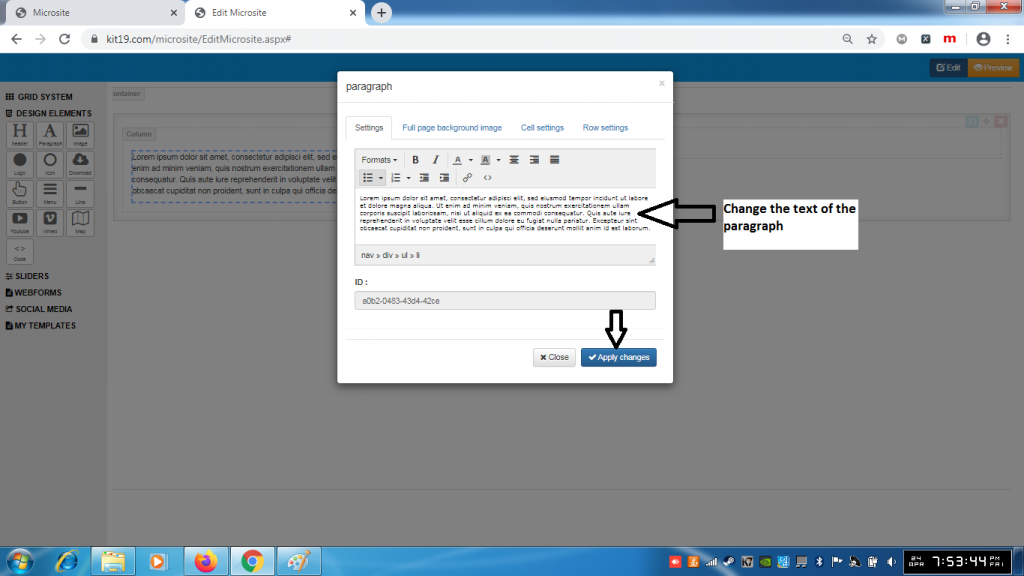
- Change the text of the paragraph
- Click Apply Changes
- The text of the paragraph will change
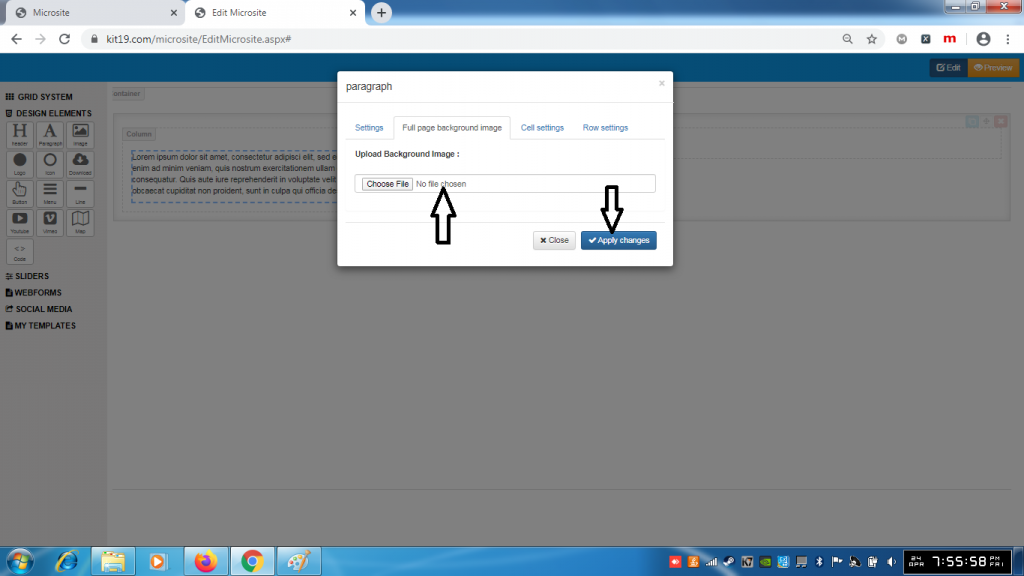
- Choose an image of your choice
- Click Apply Changes
- A background image would be added to the paragraph
Note: Once a background image is added it cannot be removed. You can change the background image as many times as you want. To remove the back around image, just delete the paragraph element and add a new one.
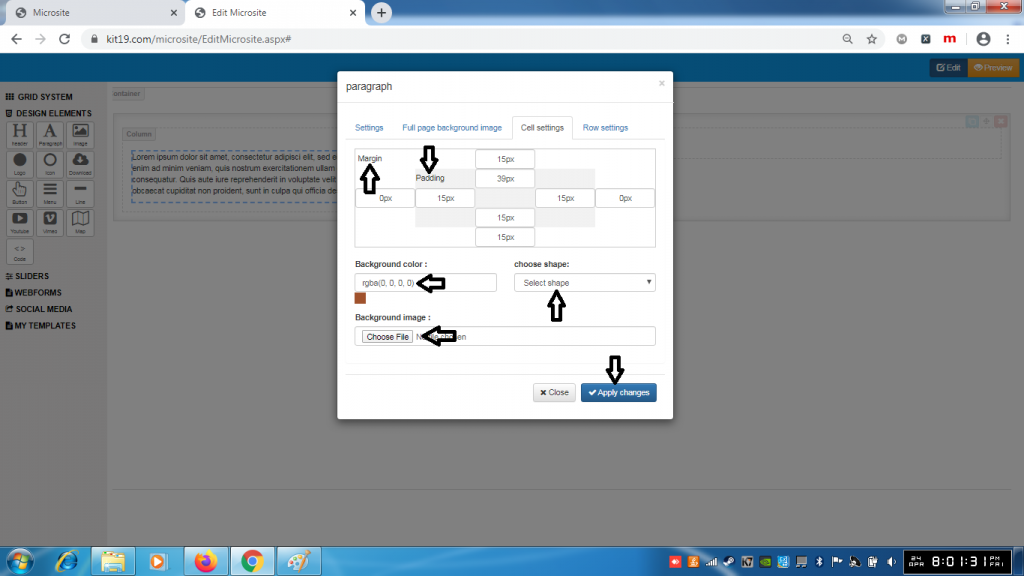
- Change the margin of the paragraph cell
- Change the padding of the paragraph cell
- Change the background of the paragraph cell
- Change the shape of the paragraph cell
- Change the background image of the paragraph cell
- Click Apply Changes
Note: You can change all of the settings of the paragraph cell at the same time or you can change the settings that you like.
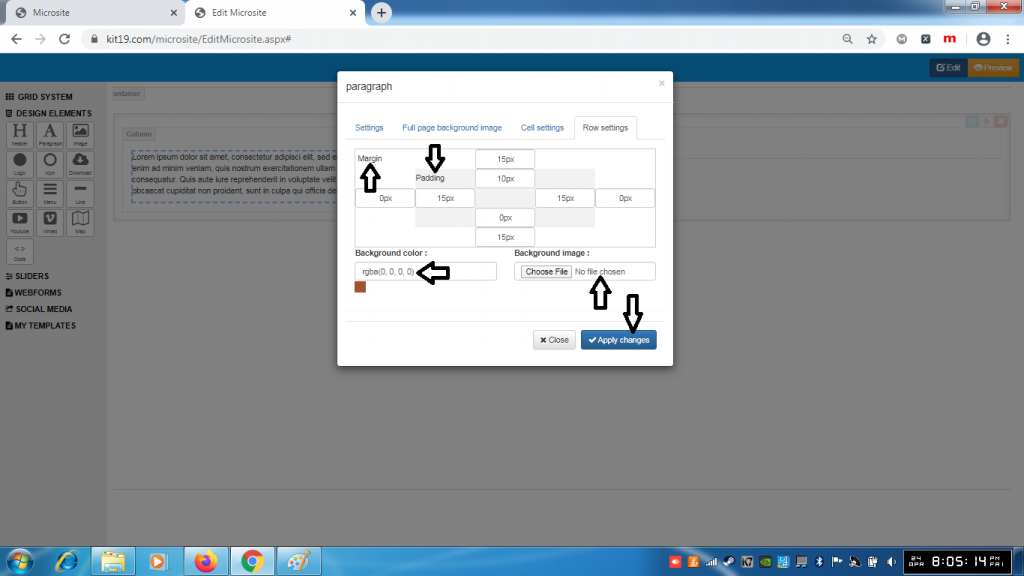
- Change the margin of the paragraph row
- Change the padding of the paragraph row
- Change the background of the paragraph row
- Change the shape of the paragraph row
- Change the background image of the paragraph row
- Click Apply Changes
Note: You can change all of the settings of the paragraph row at the same time or you can change the settings that you like.
Image Settings:

- Click the Image settings button
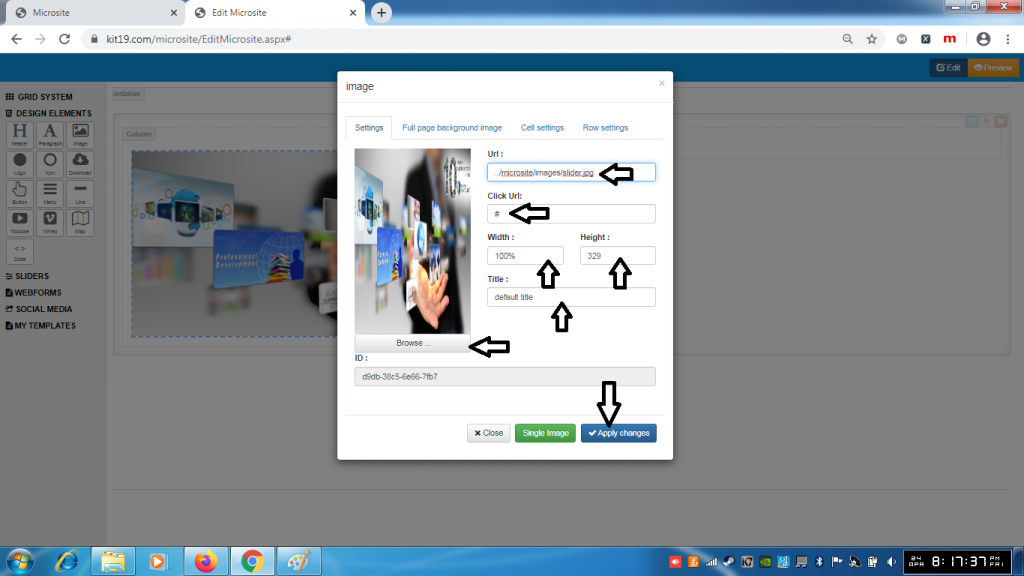
- In the Url field enter the location of the image
- In the Click Url field enter the Url which will open when the user clicks on the image
- In the width field enter the width of the image you want
- In the height field enter the height of the image you want
- In the title field field enter the title you want the title would be displayed when the user hovers over the image
- Click browse to change the image
- Click Apply changes
Note: You can change all of the settings at the same time or any setting that you like
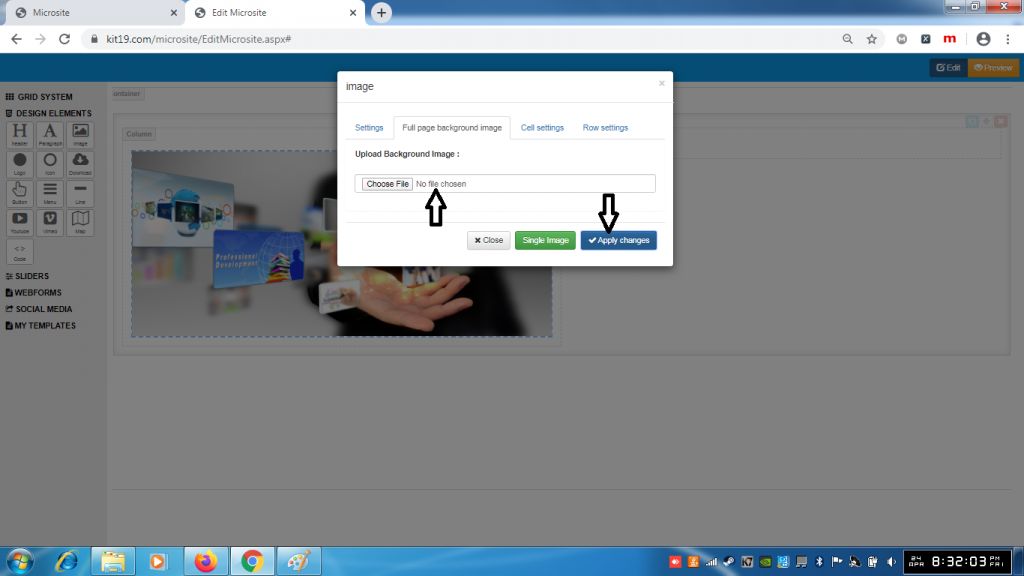
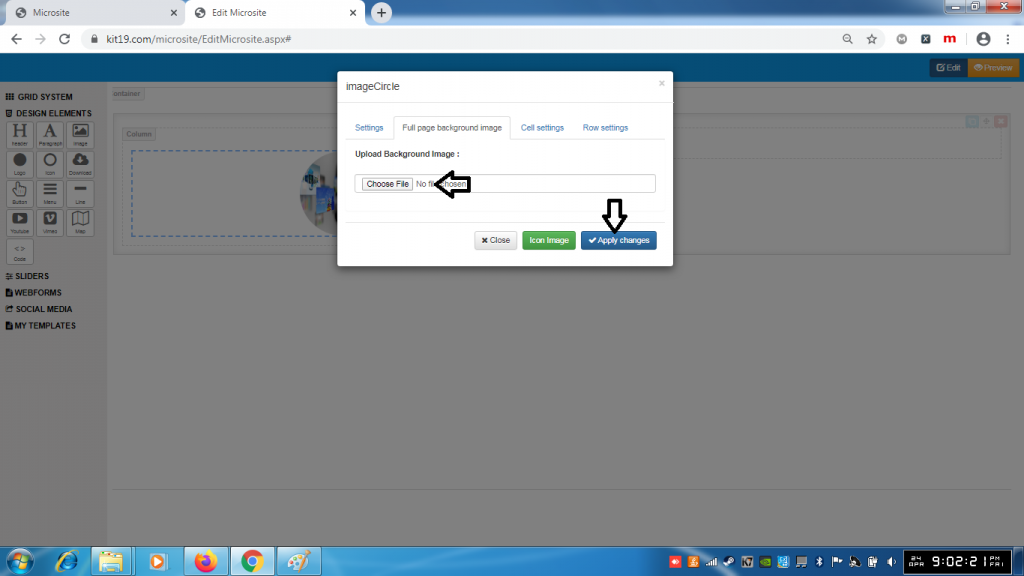
- Choose an image of your choice
- Click Apply Changes
- A background image would be added to the Image element
Note: Once a background image is added it cannot be removed. You can change the background image as many times as you want. To remove the back around image, just delete the image element and add a new one.
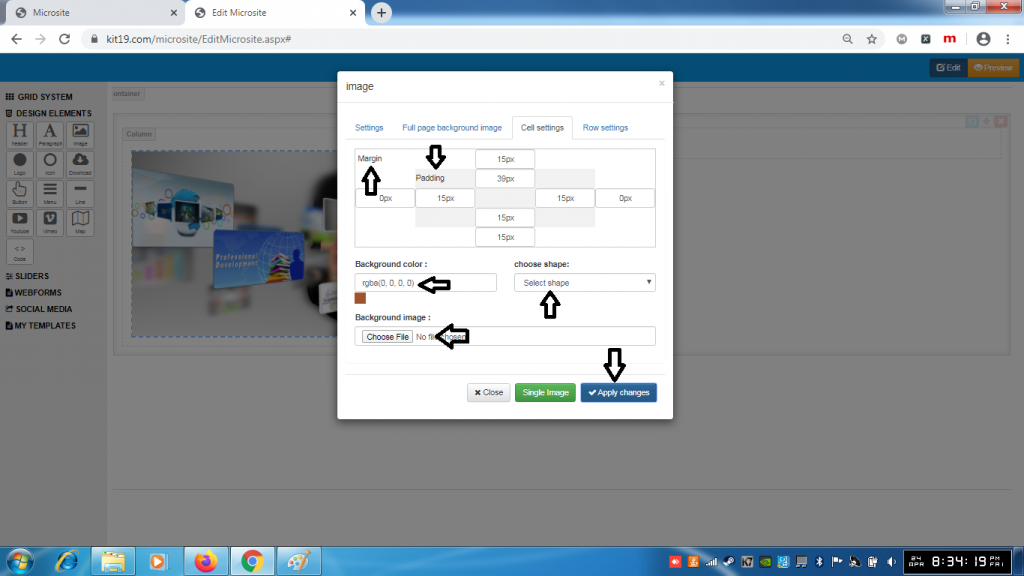
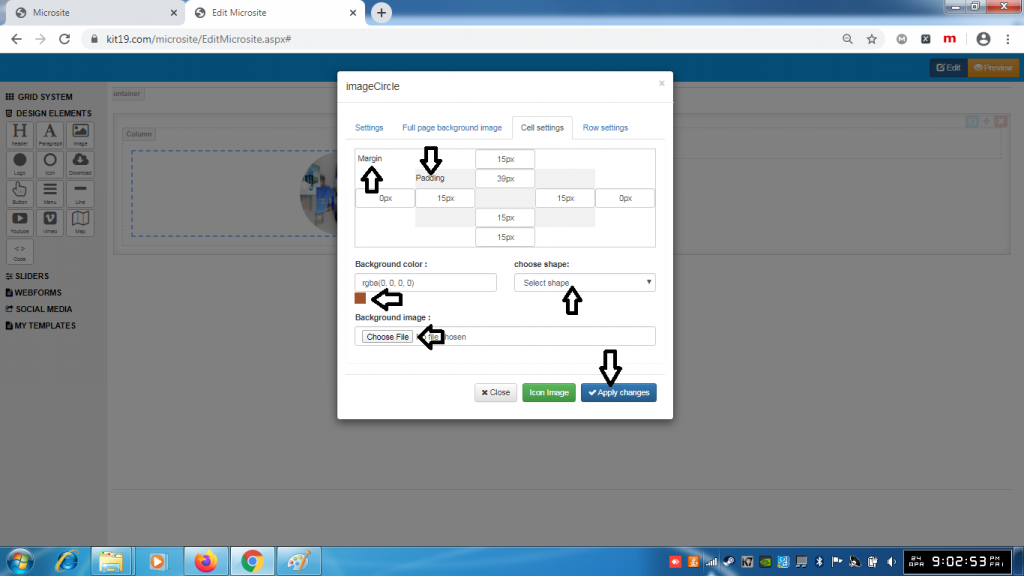
- Change the margin of the Image cell
- Change the padding of the Image cell
- Change the background of the Image cell
- Change the shape of the Image cell
- Change the background image of the Image cell
- Click Apply Changes
Note: You can change all of the settings of the Image cell at the same time or you can change the settings that you like.
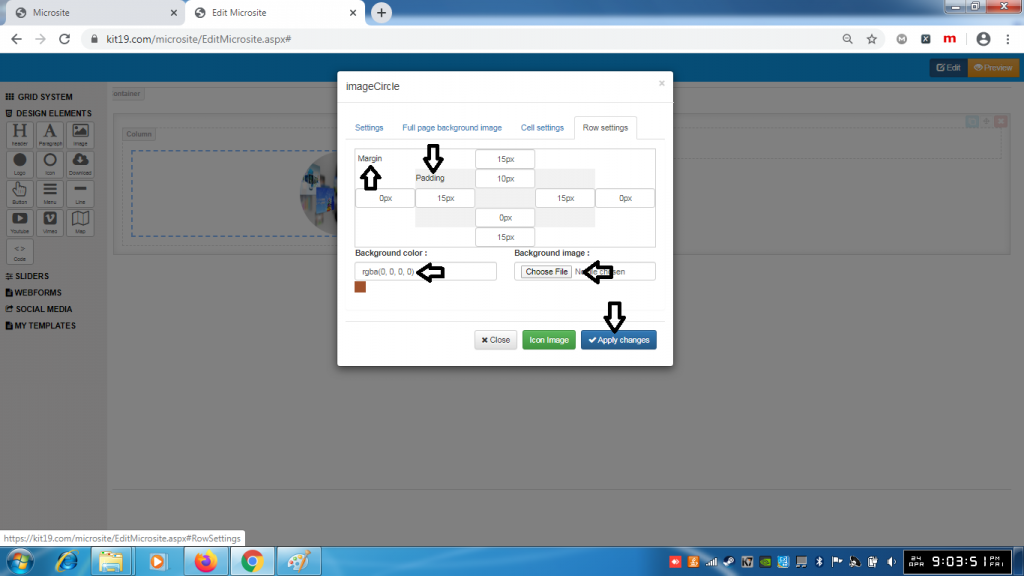
- Change the margin of the Image row
- Change the padding of the Image row
- Change the background of the Image row
- Change the shape of the Image row
- Change the background image of the Image row
- Click Apply Changes
Note: You can change all of the settings of the Image row at the same time or you can change the settings that you like.
Logo Settings:
- Click the Logo Settings Icon
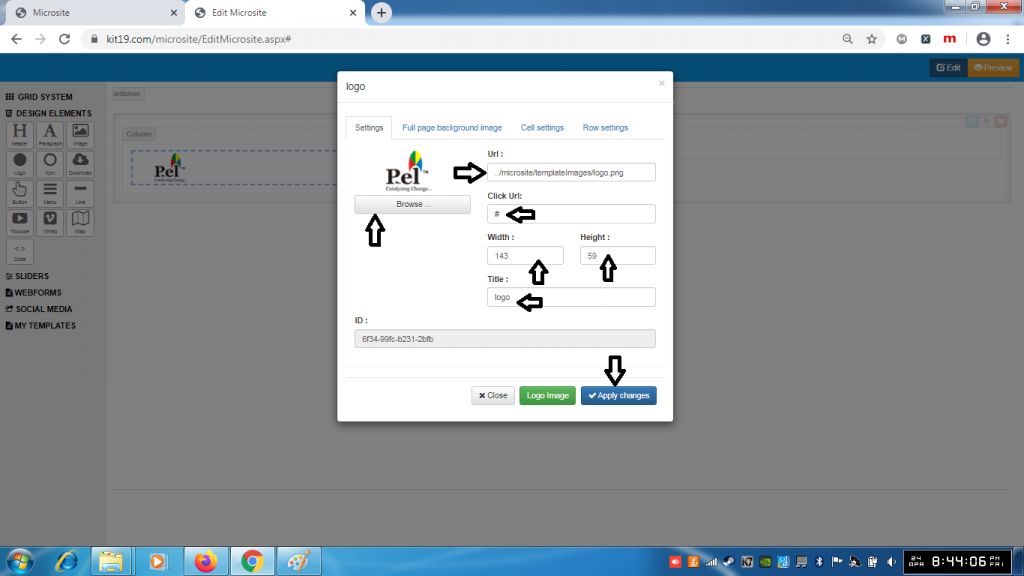
- In the Url field enter the location of the image for logo
- In the Click Url field enter the Url which will open when the user clicks on the logo
- In the width field enter the width of the logo you want
- In the height field enter the height of the logo you want
- In the title field field enter the title you want the title would be displayed when the user hovers over the logo
- Click browse to change the image of logo
- Click Apply changes
Note: You can change all of the settings at the same time or any setting that you like
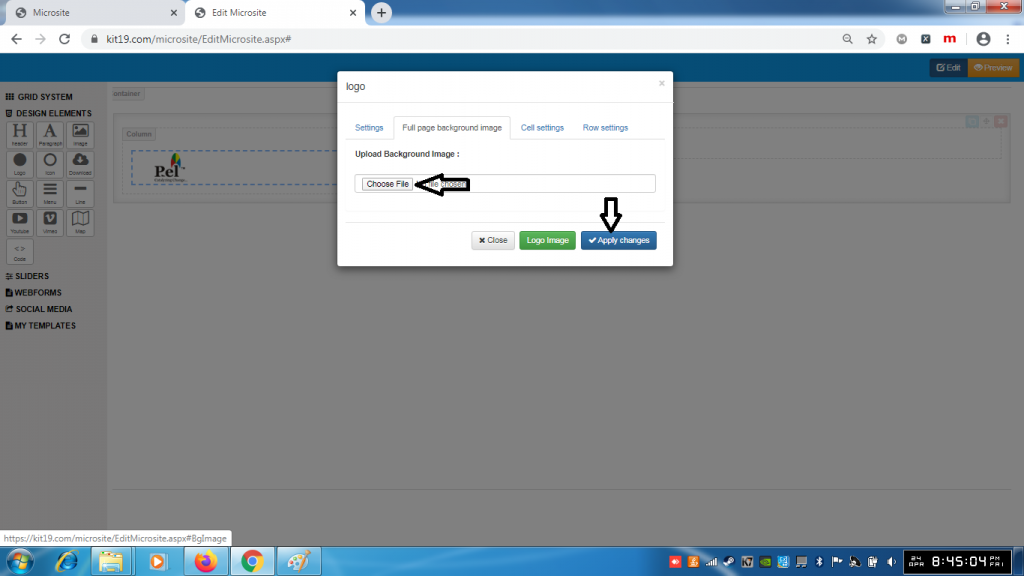
- Choose an image of your choice
- Click Apply Changes
- A background image would be added to the Image element
Note: Once a background image is added it cannot be removed. You can change the background image as many times as you want. To remove the back around image, just delete the logo element and add a new one.
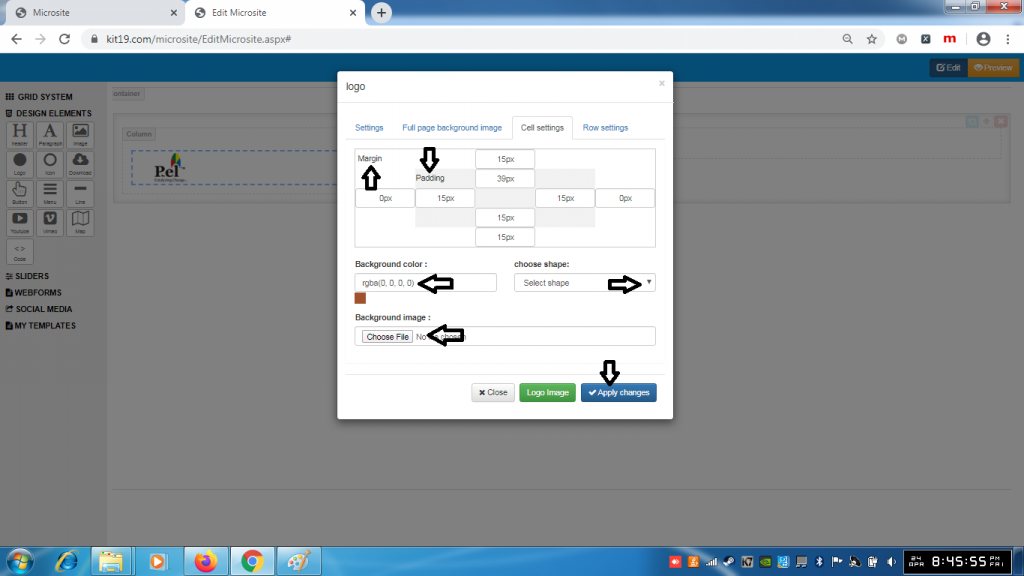
- Change the margin of the Logo cell
- Change the padding of the Logo cell
- Change the background of the Logo cell
- Change the shape of the Logo cell
- Change the background image of the Logo cell
- Click Apply Changes
Note: You can change all of the settings of the Logo cell at the same time or you can change the settings that you like.
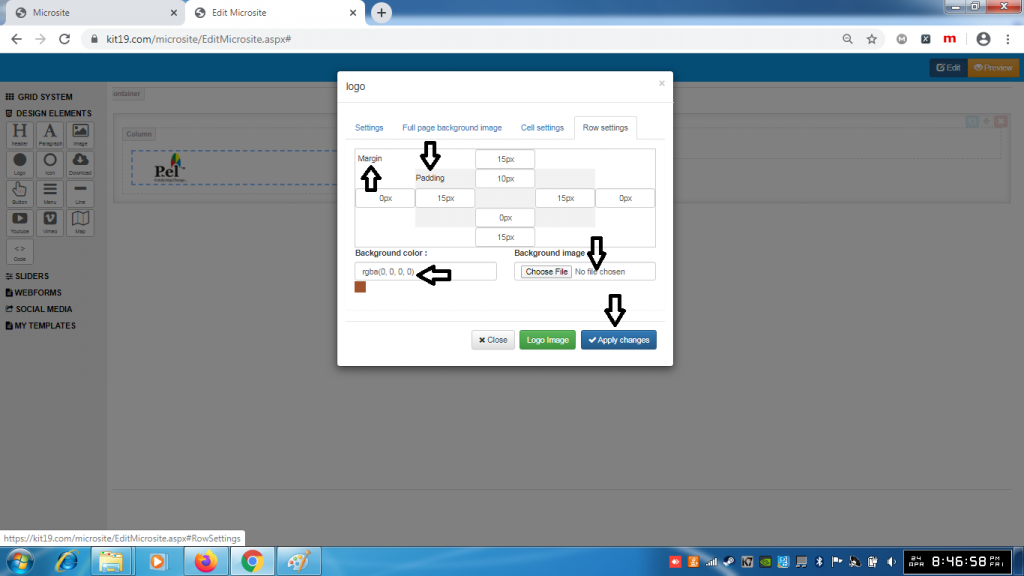
- Change the margin of the Logo row
- Change the padding of the Logo row
- Change the background of the Logo row
- Change the shape of the Logo row
- Change the background image of the Logo row
- Click Apply Changes
Note: You can change all of the settings of the Logo row at the same time or you can change the settings that you like.
Icon Settings:
- Click the Icon Settings button
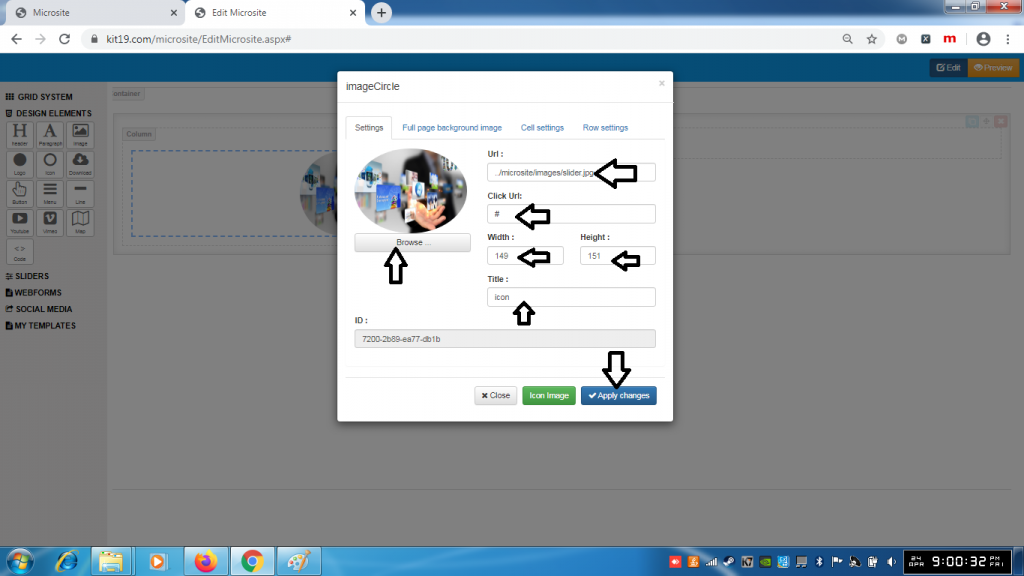
- In the Url field enter the location of the image for Icon
- In the Click Url field enter the Url which will open when the user clicks on the Icon
- In the width field enter the width of the Icon you want
- In the height field enter the height of the Icon you want
- In the title field field enter the title you want the title would be displayed when the user hovers over the Icon
- Click browse to change the image of Icon
- Click Apply changes
Note: You can change all of the settings at the same time or any setting that you like
- Choose an image of your choice
- Click Apply Changes
- A background image would be added to the Icon element
Note: Once a background image is added it cannot be removed. You can change the background image as many times as you want. To remove the back around image, just delete the Icon element and add a new one.
- Change the margin of the Icon cell
- Change the padding of the Icon cell
- Change the background of the Icon cell
- Change the shape of the Icon cell
- Change the background image of the Icon cell
- Click Apply Changes
Note: You can change all of the settings of the Icon cell at the same time or you can change the settings that you like.
- Change the margin of the Icon row
- Change the padding of the Icon row
- Change the background of the Icon row
- Change the shape of the Icon row
- Change the background image of the Icon row
- Click Apply Changes
Note: You can change all of the settings of the Icon row at the same time or you can change the settings that you like.
Dowload Settings:

- Click the Download settings Icon
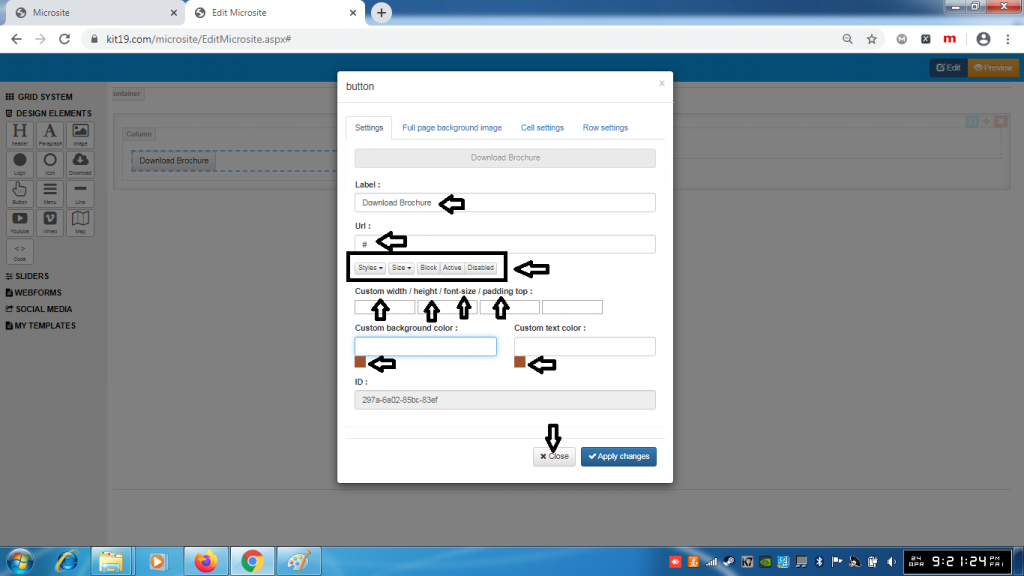
- In the label field enter the name of the field that you want
- In the url enter the URL from which you want to download an item
- Select the style of the download button from the Styles drop down
- Select the size of the download button from the Size drop down
- Click the Block button to make the download button wider
- Click the Active button to activate the download button
- Click the Disable button to deactivate the download button
- Enter the width you want in the custom width field
- Enter the height you want in the custom height field
- Enter the font-size you want in font-size field
- Enter the padding you want in the padding field
- Select the background color of the download button you want
- Select the text color of the download button you want
- Click Apply changes
Note: You can change all of the settings of the Download button at the same time or any setting that you like
- Choose an image of your choice
- Click Apply Changes
- A background image would be added to the Download element
Note: Once a background image is added it cannot be removed. You can change the background image as many times as you want. To remove the back around image, just delete the Download element and add a new one.
- Change the margin of the Download cell
- Change the padding of the Download cell
- Change the background of the Download cell
- Change the shape of the Download cell
- Change the background image of the Download cell
- Click Apply Changes
Note: You can change all of the settings of the Download cell at the same time or you can change the settings that you like.

- Change the margin of the Download row
- Change the padding of the Download row
- Change the background of the Download row
- Change the shape of the Download row
- Change the background image of the Download row
- Click Apply Changes
Note: You can change all of the settings of the Download row at the same time or you can change the settings that you like.
Button Settings:
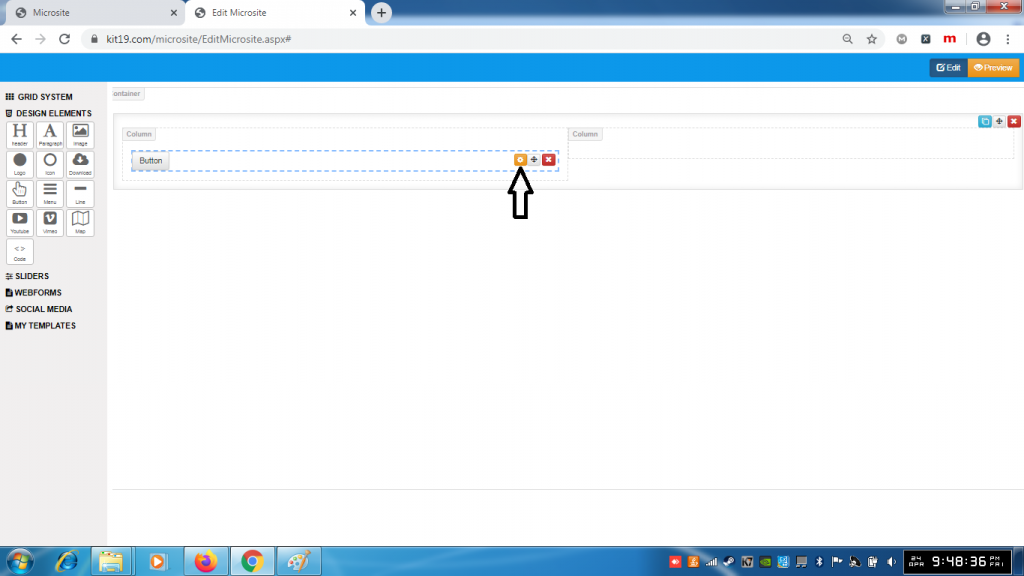
- Click button settings icon

- In the label field enter the name of the field that you want
- In the url enter the URL from which you want to link the button
- Select the style of the button from the Styles drop down
- Select the size of the button from the Size drop down
- Click the Block button to make the button wider
- Click the Active button to activate the button
- Click the Disable button to deactivate the button
- Enter the width you want in the custom width field
- Enter the height you want in the custom height field
- Enter the font-size you want in font-size field
- Enter the padding you want in the padding field
- Select the background color of the button you want
- Select the text color of the button you want
- Click Apply changes
Note: You can change all of the settings of the button at the same time or any setting that you like
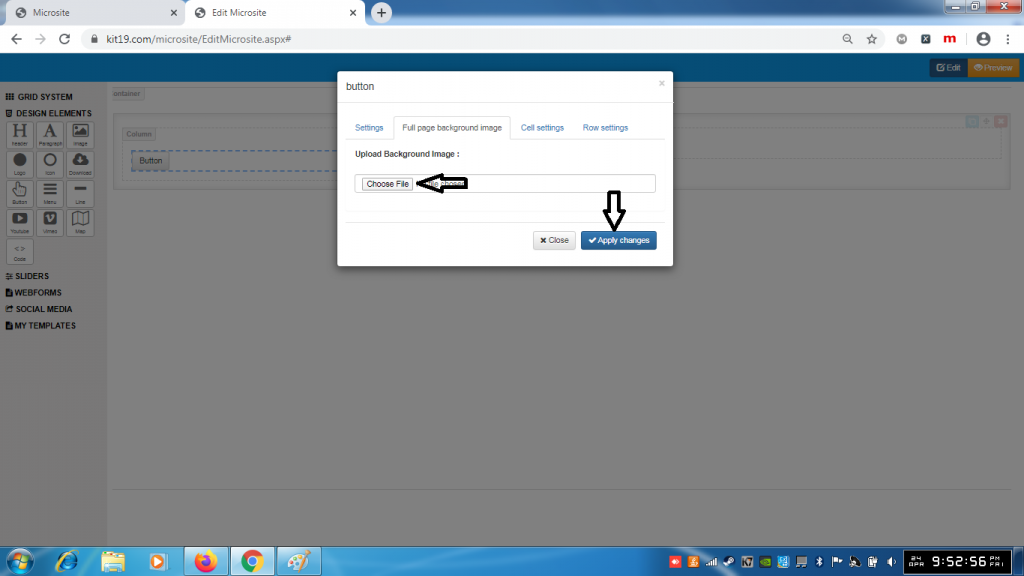
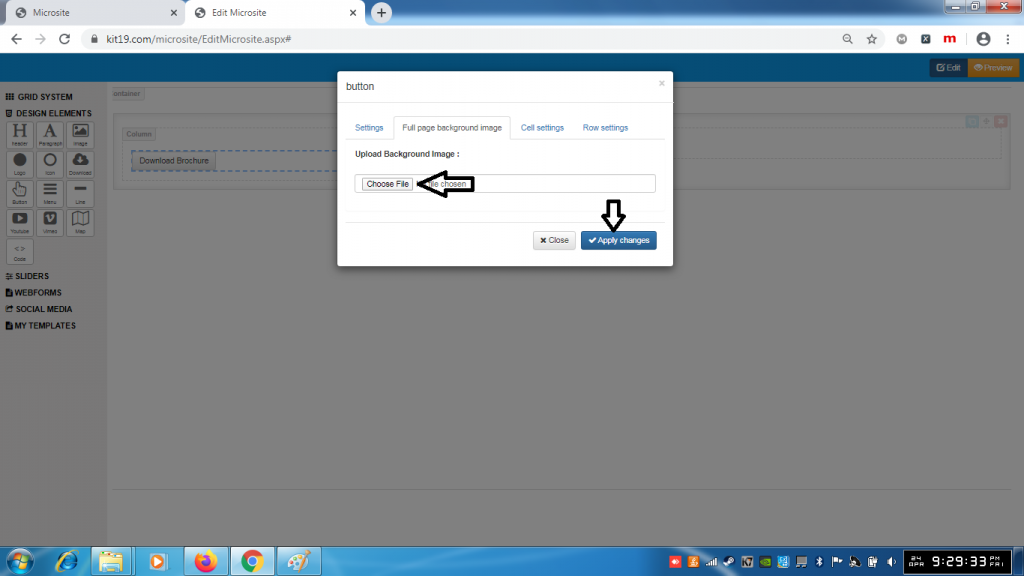
- Choose an image of your choice
- Click Apply Changes
- A background image would be added to the Button element
Note: Once a background image is added it cannot be removed. You can change the background image as many times as you want. To remove the back around image, just delete the Button element and add a new one.
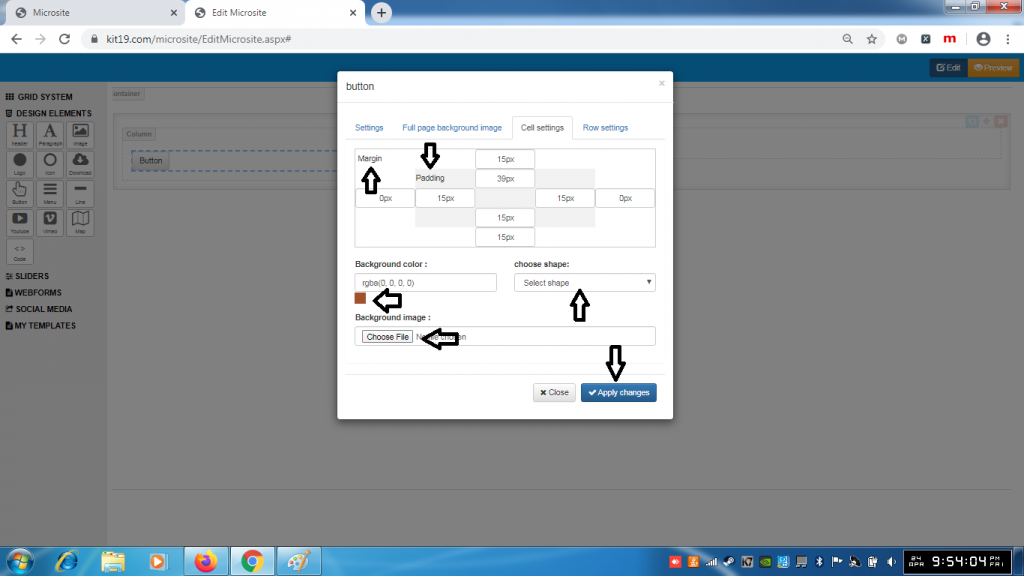
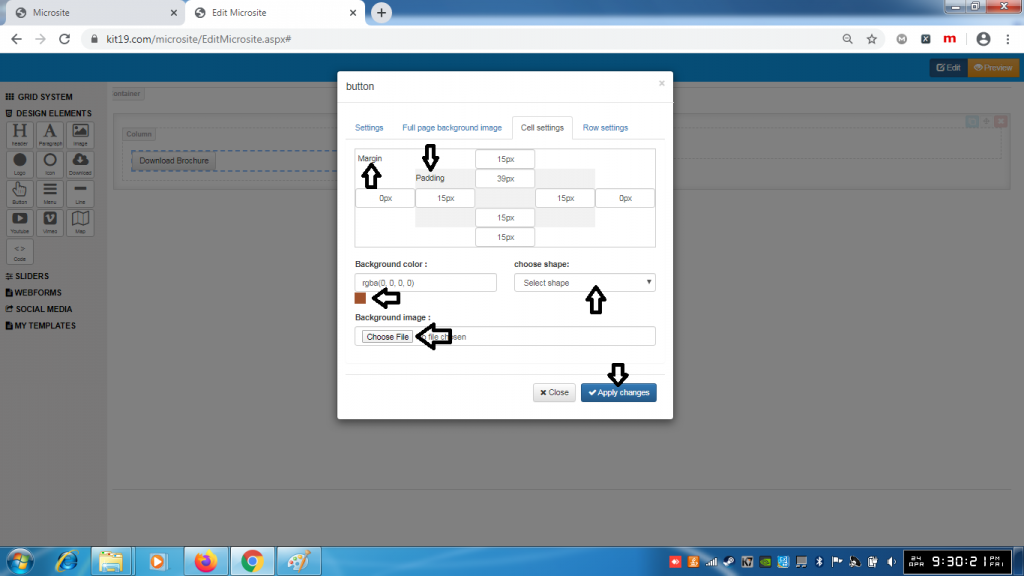
- Change the margin of the Button cell
- Change the padding of the Button cell
- Change the background of the Button cell
- Change the shape of the Button cell
- Change the background image of the Button cell
- Click Apply Changes
Note: You can change all of the settings of the Button cell at the same time or you can change the settings that you like.
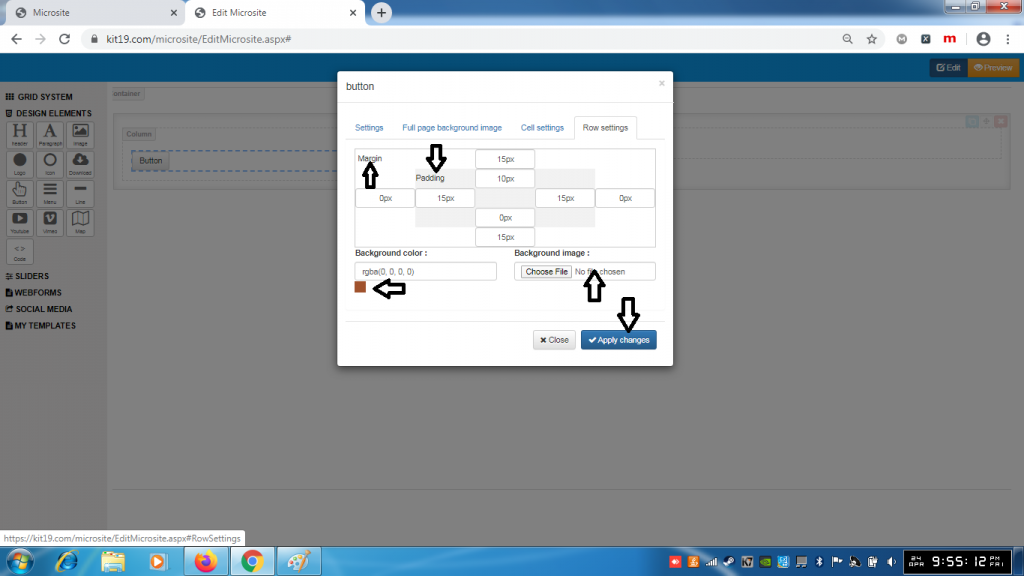
- Change the margin of the Button row
- Change the padding of the Button row
- Change the background of the Button row
- Change the shape of the Button row
- Change the background image of the Button row
- Click Apply Changes
Note: You can change all of the settings of the Button row at the same time or you can change the settings that you like.
Menu Settings:
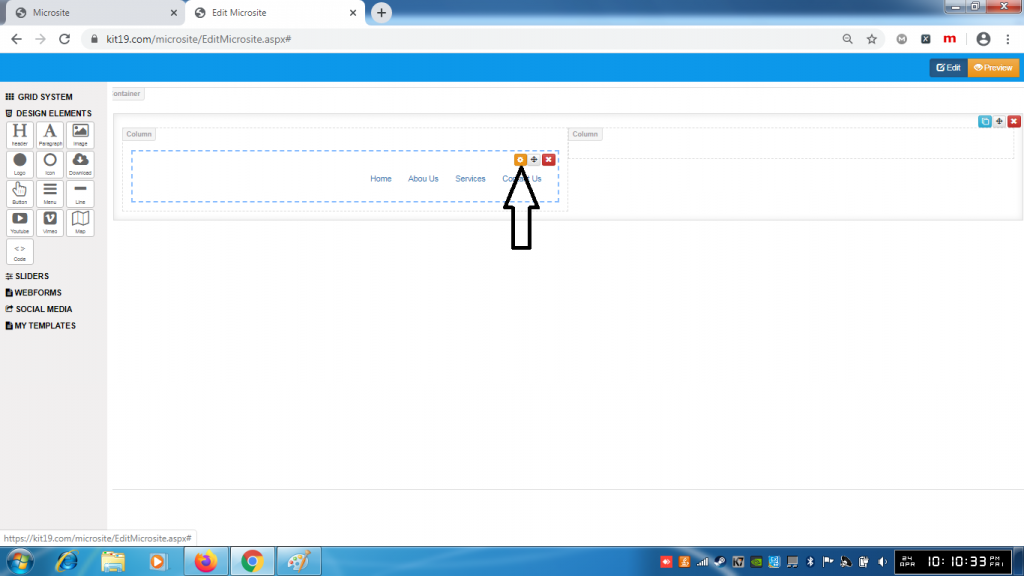
- Click the Menu Settings button
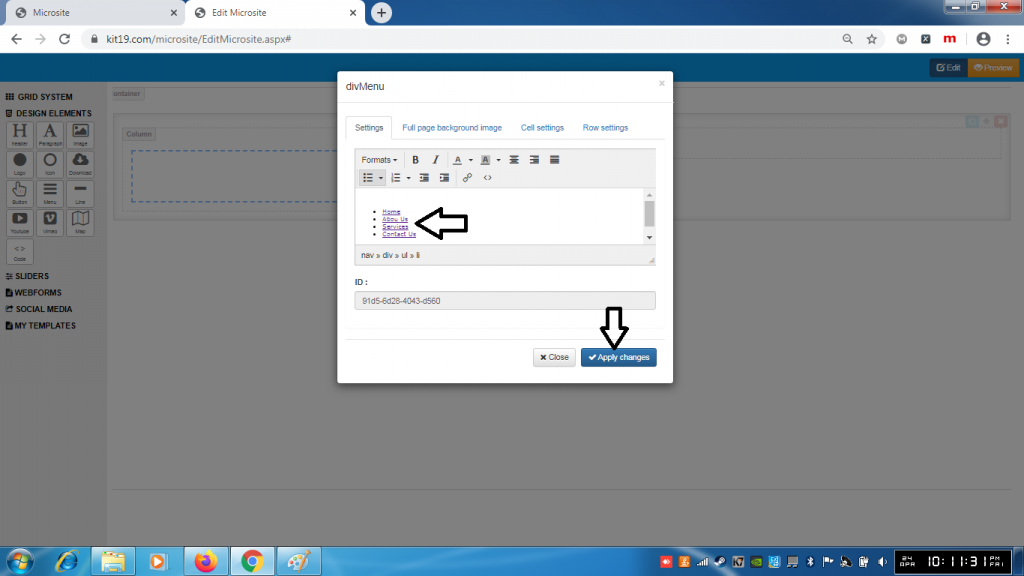
- Change the text of navigation links
- You can also add new navigation links
- Click Apply Changes

- Choose an image of your choice
- Click Apply Changes
- A background image would be added to the Menu element
Note: Once a background image is added it cannot be removed. You can change the background image as many times as you want. To remove the back around image, just delete the Menu element and add a new one.
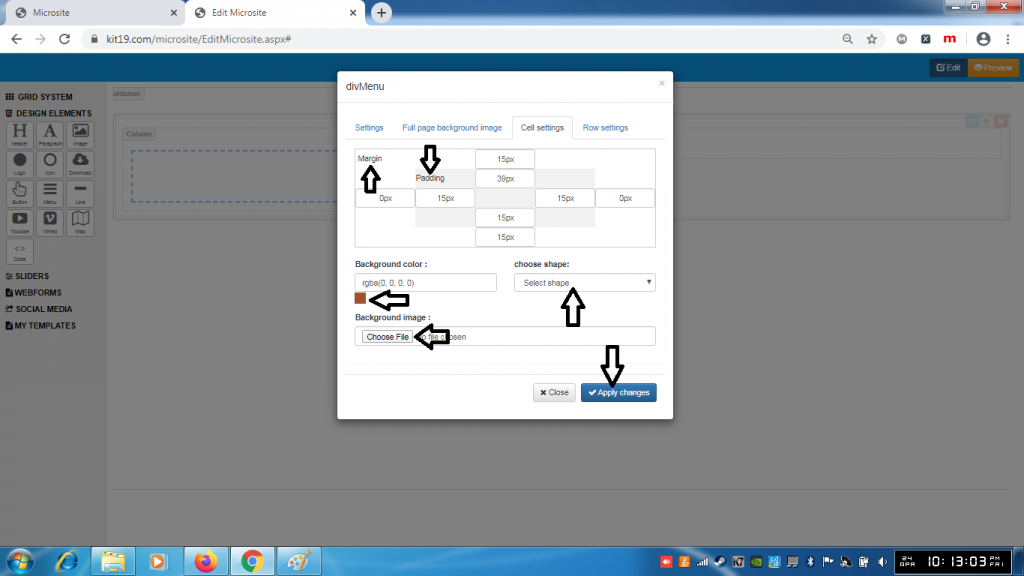
- Change the margin of the Menu cell
- Change the padding of the Menu cell
- Change the background of the Menu cell
- Change the shape of the Menu cell
- Change the background image of the Menu cell
- Click Apply Changes
Note: You can change all of the settings of the Menu cell at the same time or you can change the settings that you like.

- Change the margin of the Menu row
- Change the padding of the Menu row
- Change the background of the Menu row
- Change the shape of the Menu row
- Change the background image of the Menu row
- Click Apply Changes
Note: You can change all of the settings of the Menu row at the same time or you can change the settings that you like.
Line Settings:
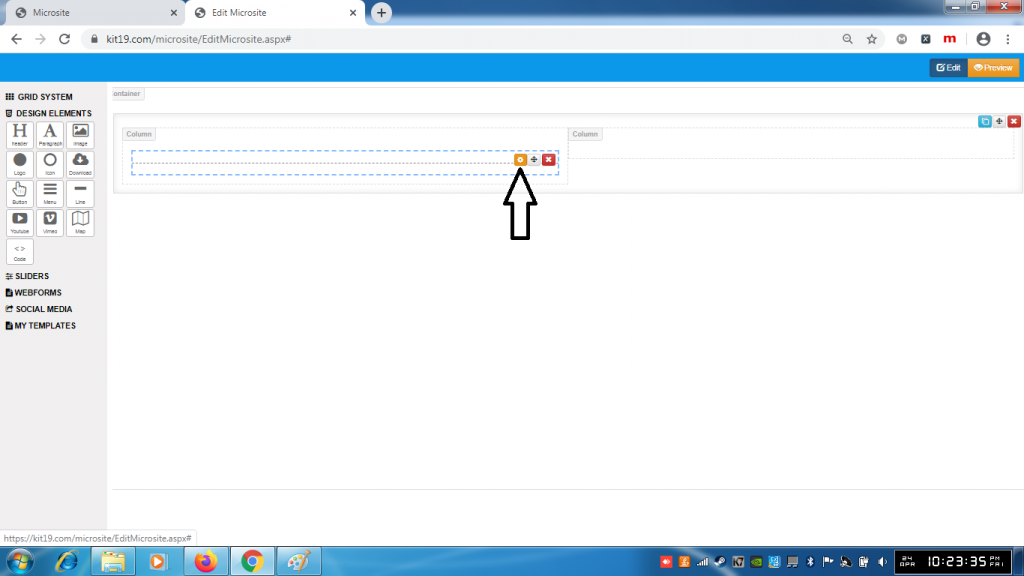
- Click the Line Settings Icon
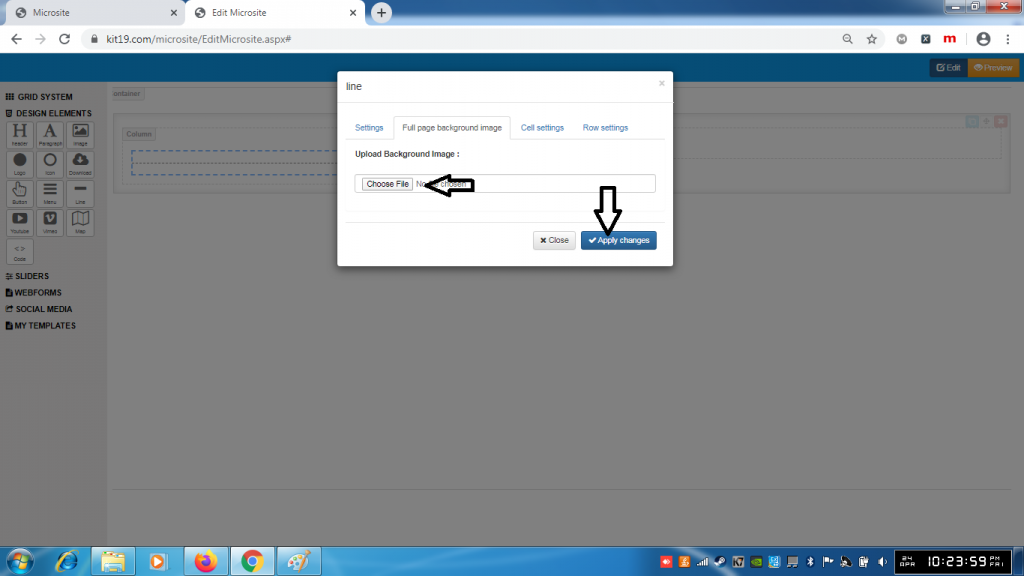
- Choose an image of your choice
- Click Apply Changes
- A background image would be added to the Line element
Note: Once a background image is added it cannot be removed. You can change the background image as many times as you want. To remove the back around image, just delete the Line element and add a new one.

- Change the margin of the Line cell
- Change the padding of the Line cell
- Change the background of the Line cell
- Change the shape of the Line cell
- Change the background image of the Line cell
- Click Apply Changes
Note: You can change all of the settings of the Line cell at the same time or you can change the settings that you like.
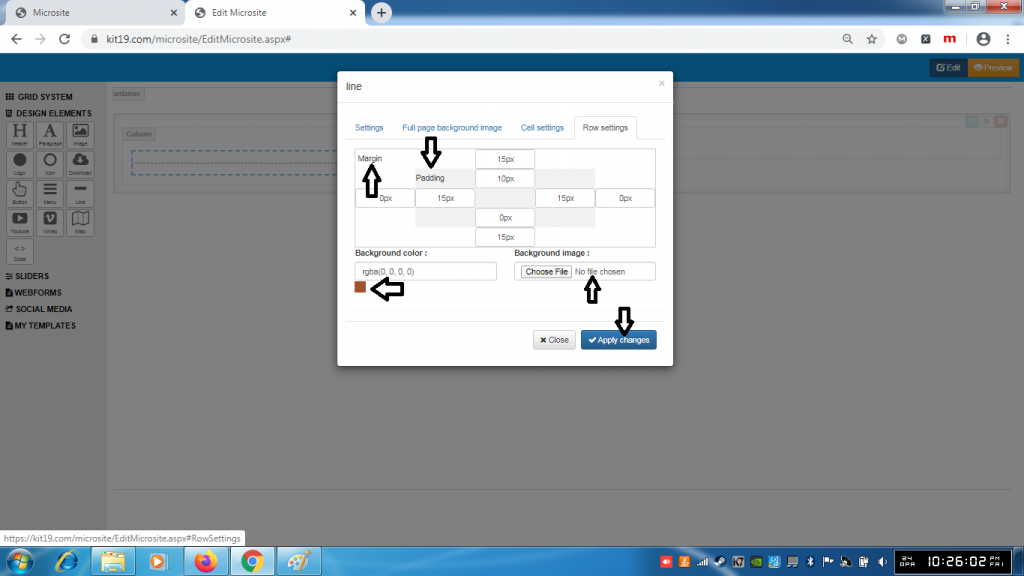
- Change the margin of the Line row
- Change the padding of the Line row
- Change the background of the Line row
- Change the shape of the Line row
- Change the background image of the Line row
- Click Apply Changes
Note: You can change all of the settings of the Line row at the same time or you can change the settings that you like.
Youtube Settings:
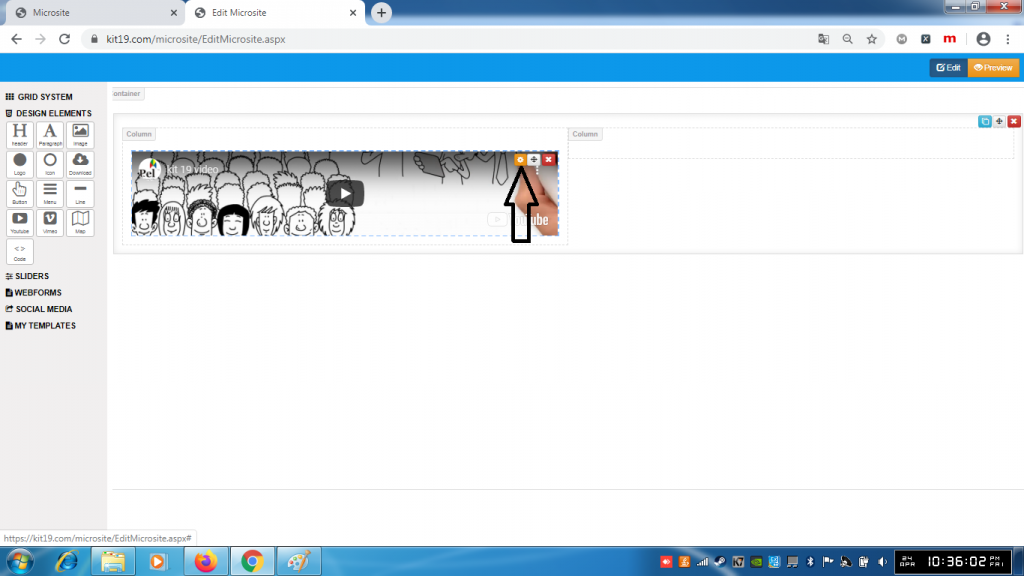
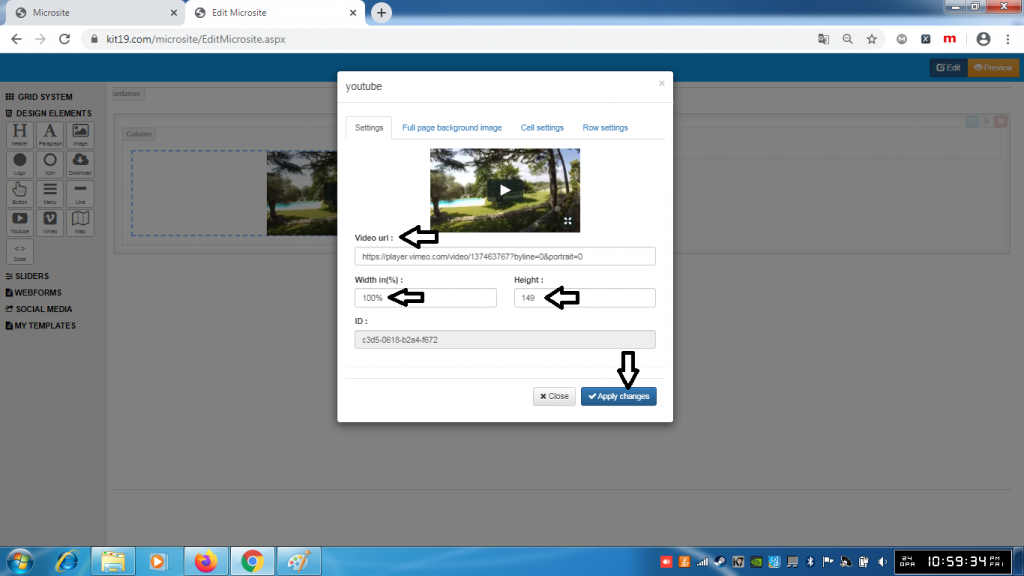
- Click the Youtube settings icon
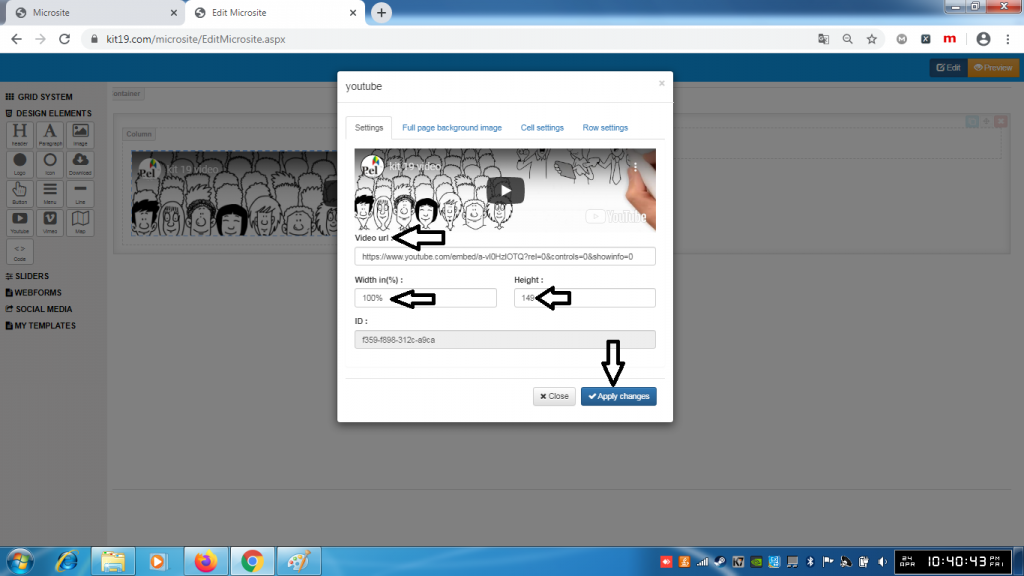
- In the url field enter the Url of the Youtube video
- In the width field enter the desired width of the Youtube video element
- In the height field enter the desired height of the Youtube video element
- Click the Apply Changes button
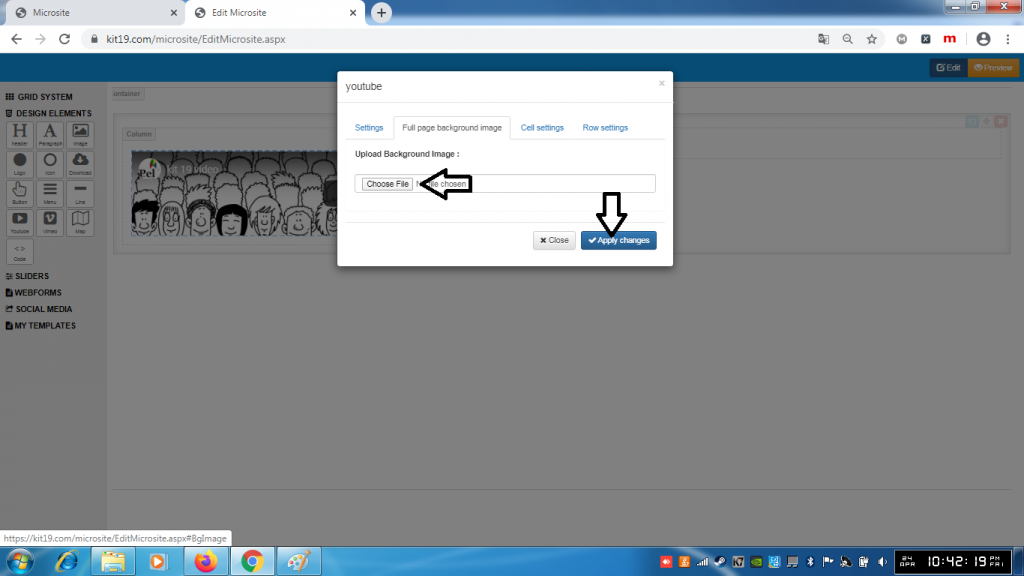
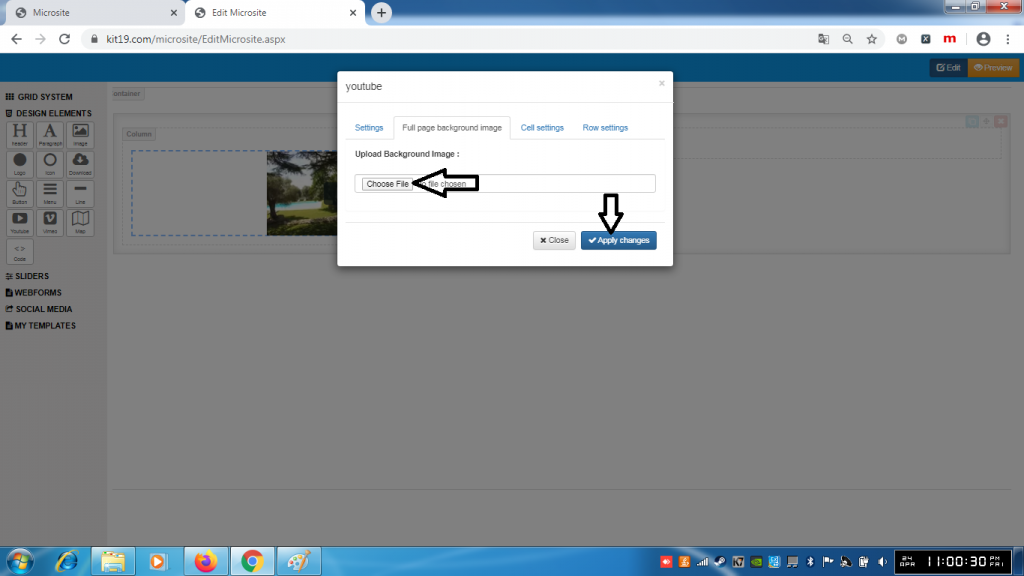
- Choose an image of your choice
- Click Apply Changes
- A background image would be added to the YouTube element
Note: Once a background image is added it cannot be removed. You can change the background image as many times as you want. To remove the back around image, just delete the Youtube element and add a new one.
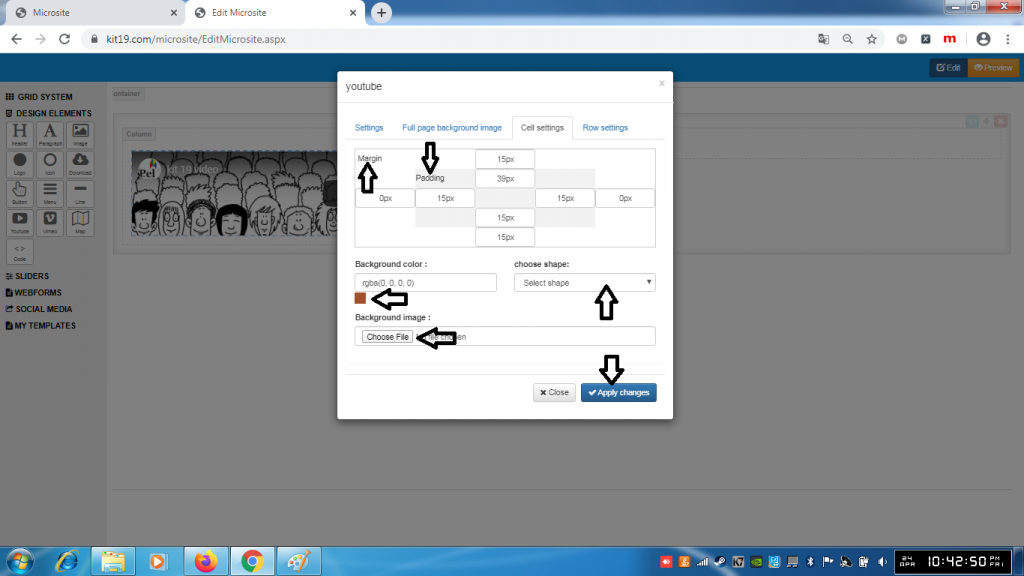
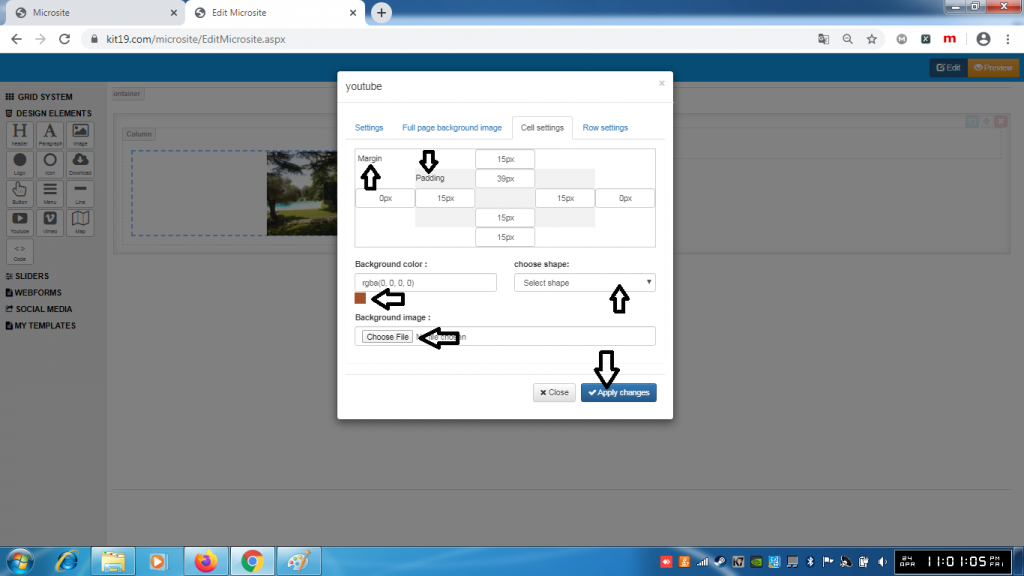
- Change the margin of the Youtube cell
- Change the padding of the Youtube cell
- Change the background of the Youtube cell
- Change the shape of the Youtube cell
- Change the background image of the Youtube cell
- Click Apply Changes
Note: You can change all of the settings of the Youtube cell at the same time or you can change the settings that you like.
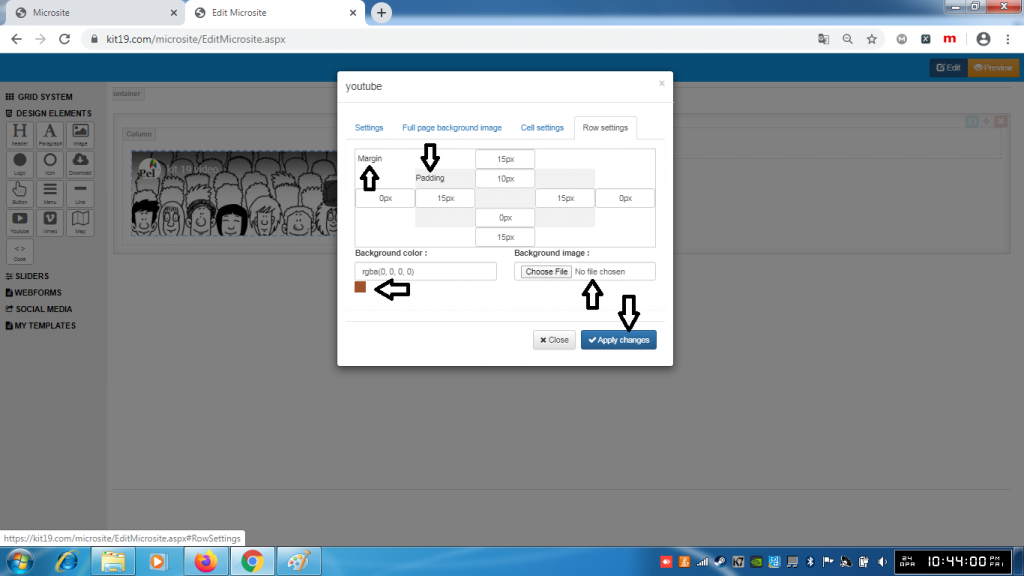
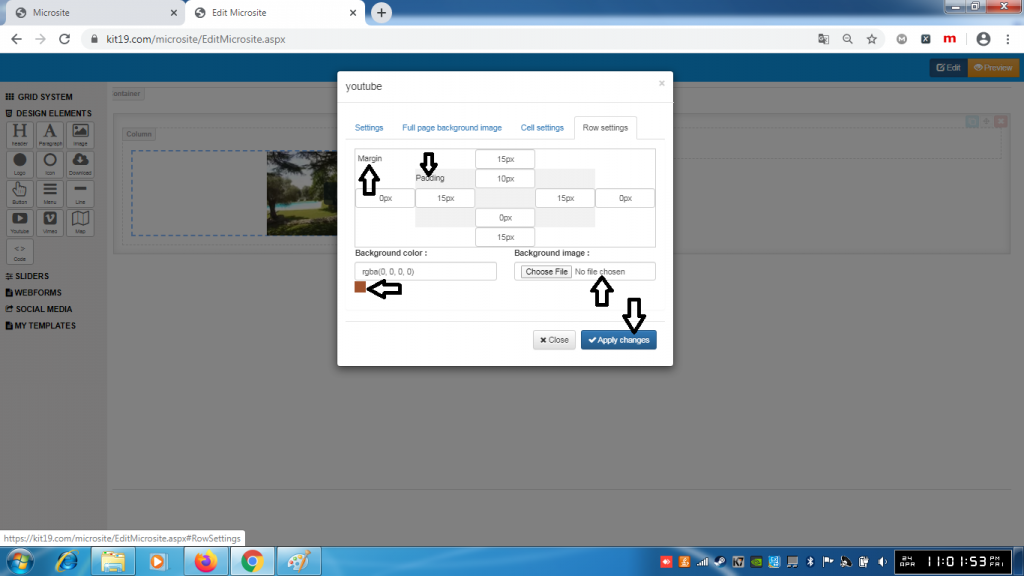
- Change the margin of the Youtube row
- Change the padding of the Youtube row
- Change the background of the Youtube row
- Change the shape of the Youtube row
- Change the background image of the Youtube row
- Click Apply Changes
Note: You can change all of the settings of the Youtube row at the same time or you can change the settings that you like
Vimeo Settings:

- Click the Vimeo Settings Icon
- In the url field enter the Url of the Vimeo video
- In the width field enter the desired width of the Vimeo video element
- In the height field enter the desired height of the Vimeo video element
- Click the Apply Changes button
- Contents of the Vimeo Element would change
- Choose an image of your choice
- Click Apply Changes
- A background image would be added to the Vimeo element
Note: Once a background image is added it cannot be removed. You can change the background image as many times as you want. To remove the back around image, just delete the Vimeo element and add a new one.
- Change the margin of the Vimeo cell
- Change the padding of the Vimeo cell
- Change the background of the Vimeo cell
- Change the shape of the Vimeo cell
- Change the background image of the Vimeo cell
- Click Apply Changes
Note: You can change all of the settings of the Vimeo cell at the same time or you can change the settings that you like.
- Change the margin of the Vimeo row
- Change the padding of the Vimeo row
- Change the background of the Vimeo row
- Change the shape of the Vimeo row
- Change the background image of the Vimeo row
- Click Apply Changes
Note: You can change all of the settings of the Vimeo row at the same time or you can change the settings that you like.
Map Settings:
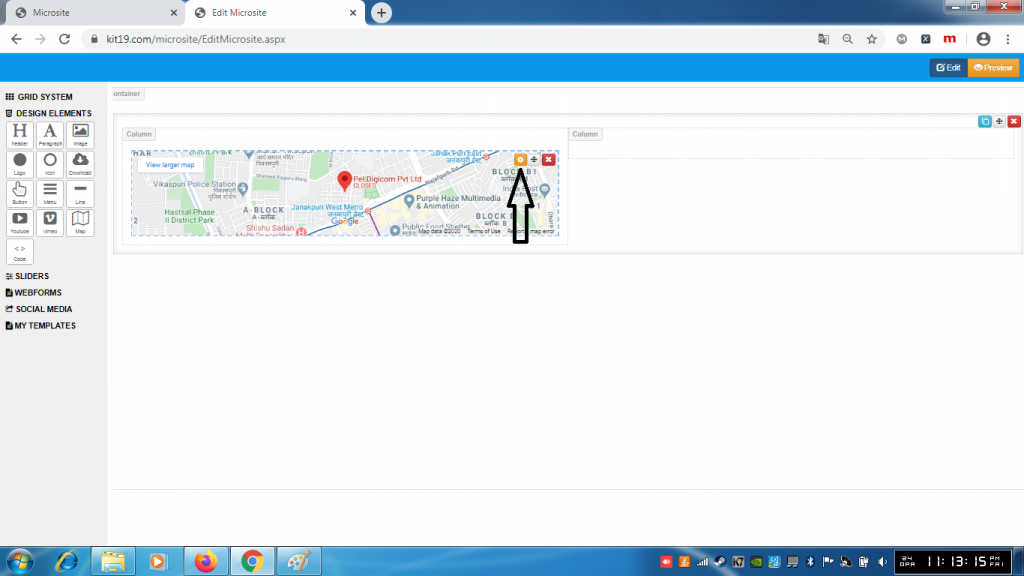
- Click the Map Settings Icon
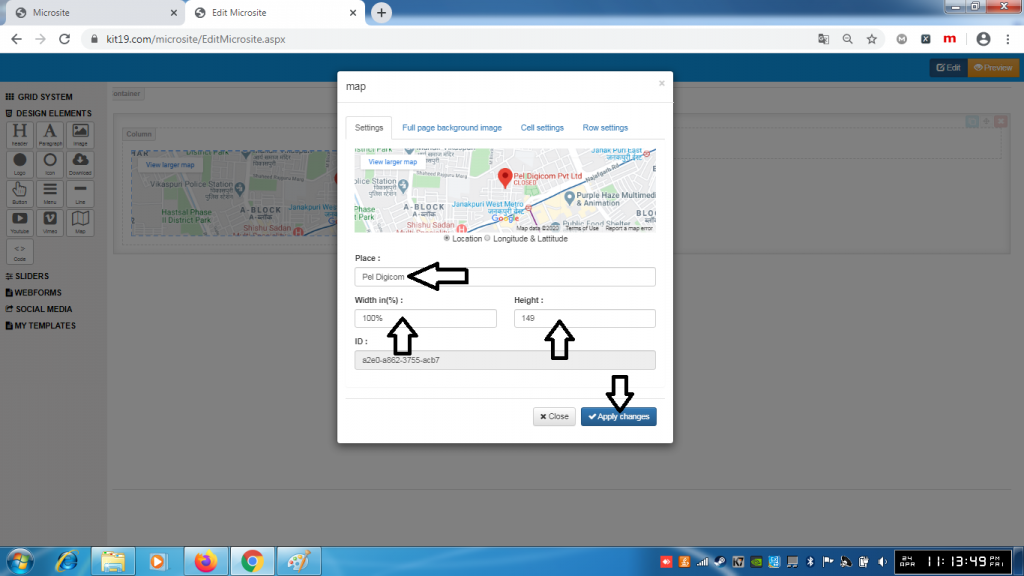
- In the place field enter the name of the Place that you want to display on the map
- In the width field enter the desired width
- In the height field enter the desired height
- Click Apply Changes
- Appearance of the map element will change
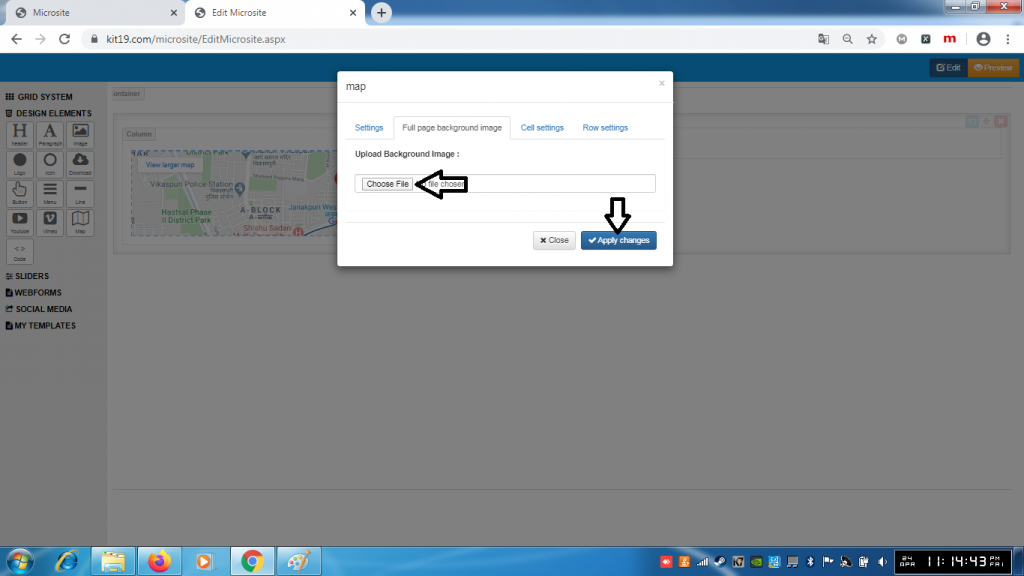
- Choose an image of your choice
- Click Apply Changes
- A background image would be added to the Map element
Note: Once a background image is added it cannot be removed. You can change the background image as many times as you want. To remove the back around image, just delete the Map element and add a new one.
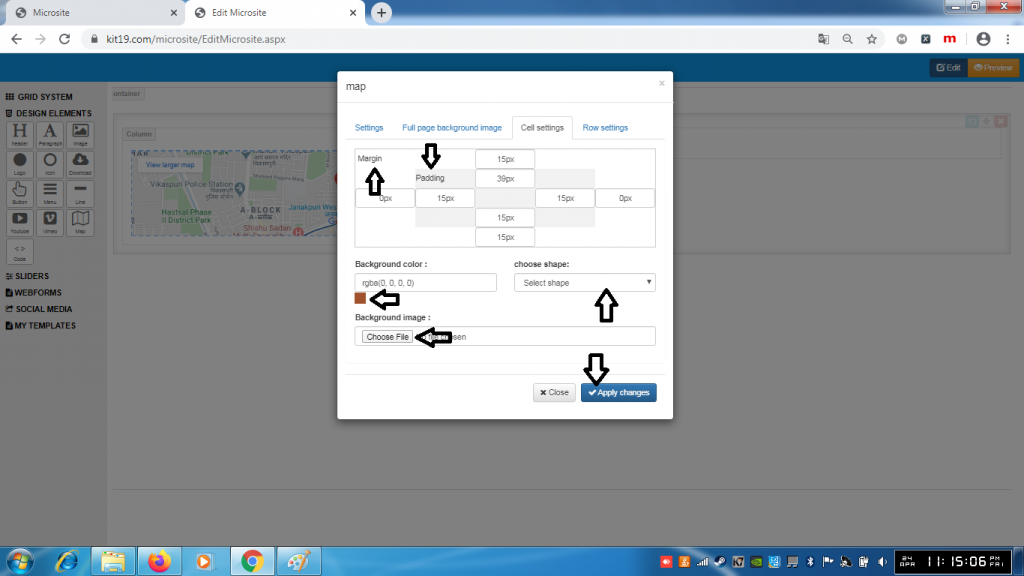
- Change the margin of the Map cell
- Change the padding of the Map cell
- Change the background of the Map cell
- Change the shape of the Map cell
- Change the background image of the Map cell
- Click Apply Changes
Note: You can change all of the settings of the Map cell at the same time or you can change the settings that you like.
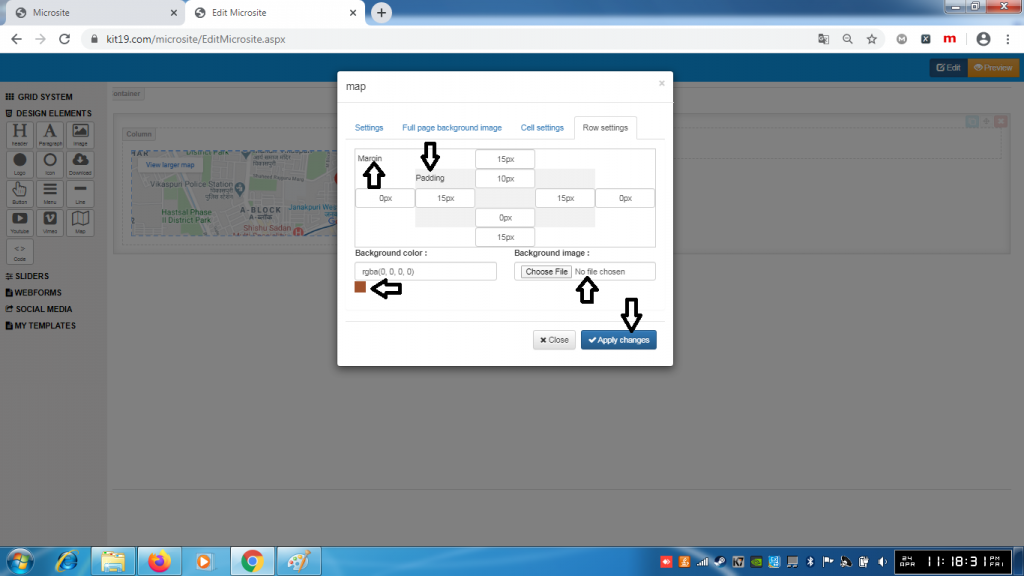
- Change the margin of the Map row
- Change the padding of the Map row
- Change the background of the Map row
- Change the shape of the Map row
- Change the background image of the Map row
- Click Apply Changes
Note: You can change all of the settings of the Map row at the same time or you can change the settings that you like.
Code Settings:
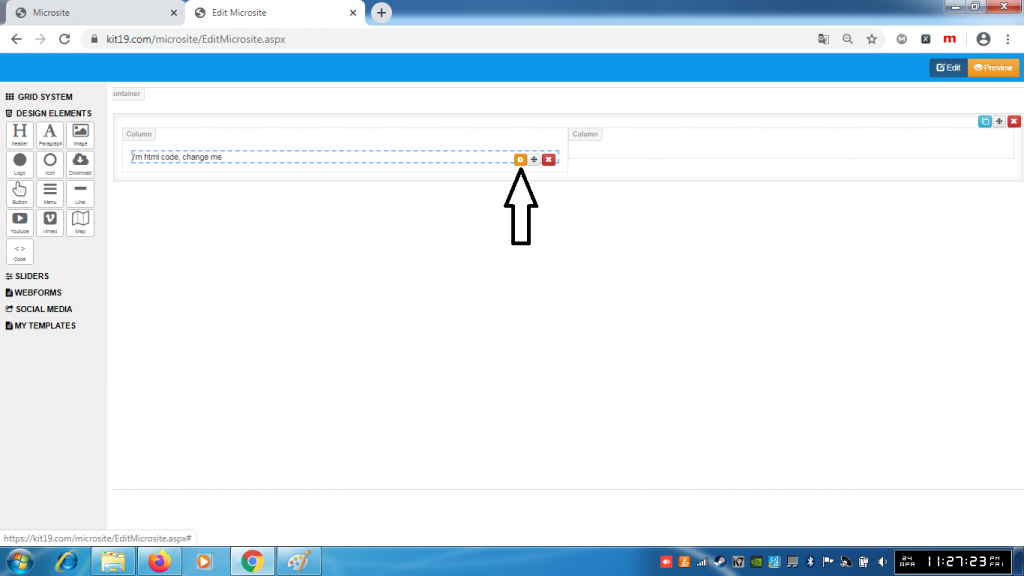
- Click the Code settings icon
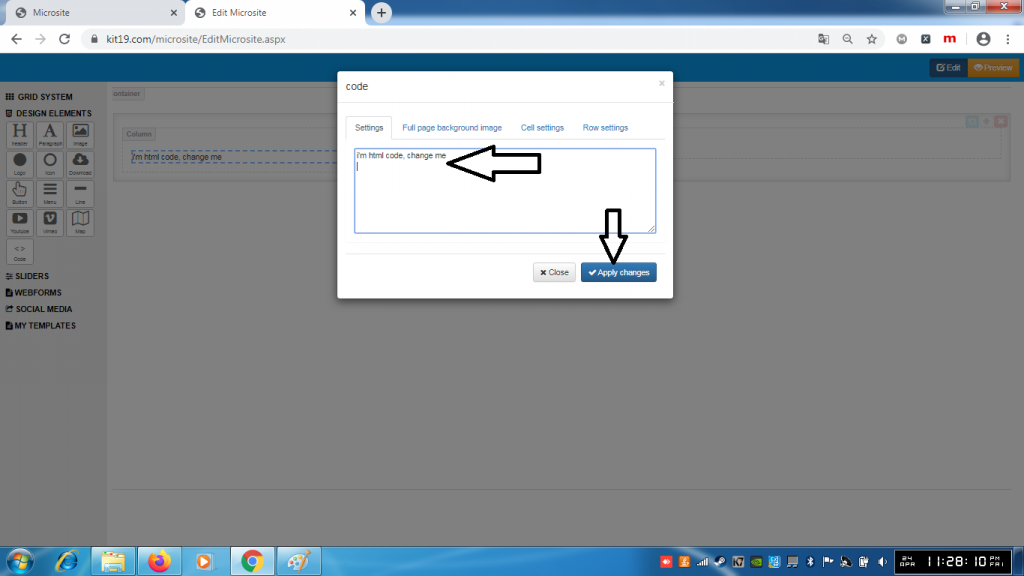
- Change the HTML code
- Click Save changes
- The content of the HTML element will change

- Choose an image of your choice
- Click Apply Changes
- A background image would be added to the Code element
Note: Once a background image is added it cannot be removed. You can change the background image as many times as you want. To remove the back around image, just delete the Code element and add a new one.
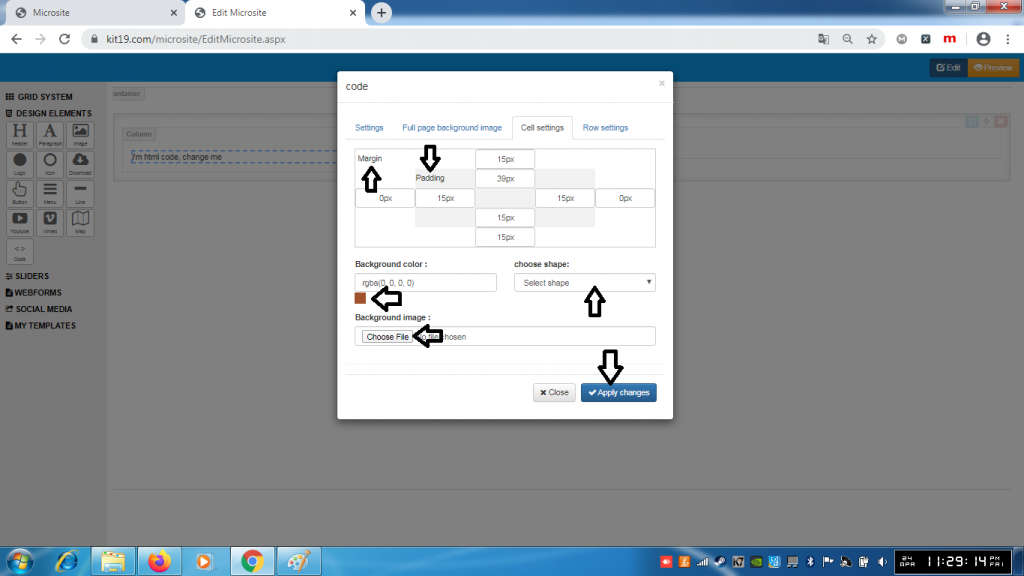
- Change the margin of the Code cell
- Change the padding of the Code cell
- Change the background of the Code cell
- Change the shape of the Code cell
- Change the background image of the Code cell
- Click Apply Changes
Note: You can change all of the settings of the Code cell at the same time or you can change the settings that you like.
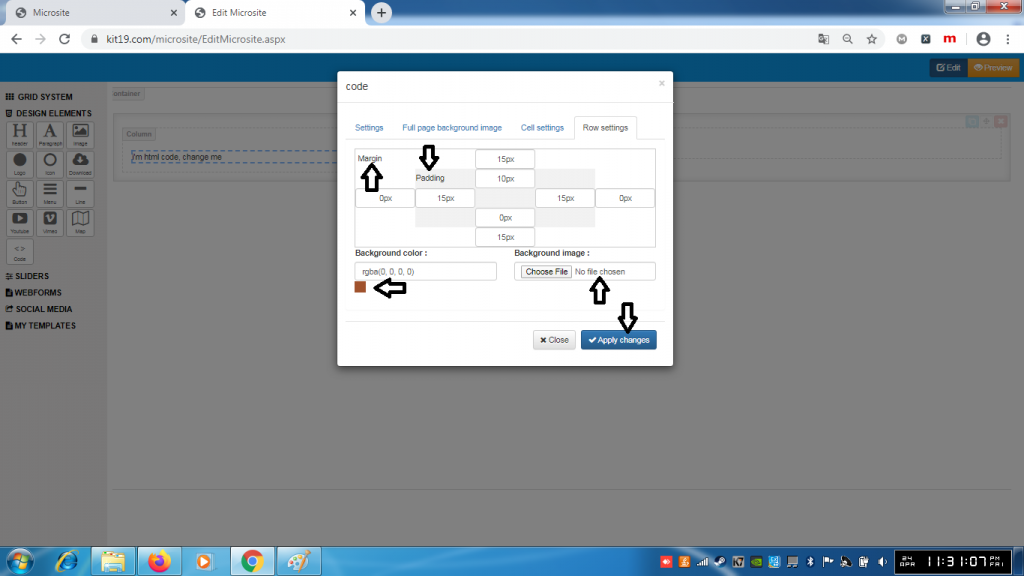
- Change the margin of the Map row
- Change the padding of the Map row
- Change the background of the Map row
- Change the shape of the Map row
- Change the background image of the Map row
- Click Apply Changes
Note: You can change all of the settings of the Map row at the same time or you can change the settings that you like.